Mastering Ubuntu Proxy Settings: A Comprehensive Guide
In today’s interconnected world, understanding how to configure Ubuntu proxy settings is crucial for secure and efficient internet access. Whether you’re a seasoned developer, a system administrator, or a regular user, knowing how to properly set up a proxy on your Ubuntu system can significantly enhance your online experience. This comprehensive guide will walk you through various methods for configuring Ubuntu proxy settings, troubleshooting common issues, and understanding the underlying principles.
Why Use a Proxy on Ubuntu?
Before diving into the configuration process, let’s explore why you might need a proxy server in the first place. Proxies act as intermediaries between your computer and the internet, offering several benefits:
- Enhanced Security: Proxies can mask your IP address, making it harder for websites and malicious actors to track your online activity.
- Access Control: Organizations use proxies to control internet access, blocking certain websites or content.
- Improved Performance: Proxies can cache frequently accessed content, reducing bandwidth usage and improving loading times.
- Bypass Geo-Restrictions: Proxies allow you to access content that might be restricted in your geographical location.
Methods for Configuring Ubuntu Proxy Settings
Ubuntu offers several ways to configure proxy settings, catering to different needs and technical expertise. We’ll cover the most common methods:
Graphical User Interface (GUI) Method
The GUI method is the simplest and most user-friendly way to configure Ubuntu proxy settings. This approach is ideal for users who prefer a visual interface.
- Open System Settings: Click on the system menu (usually located in the top-right corner of the screen) and select “Settings”.
- Navigate to Network Settings: In the Settings window, find and click on “Network”.
- Proxy Settings: Under the Network settings, you should find a “Network Proxy” or “Proxy” option. Click on it.
- Configure Proxy: In the Proxy settings window, you’ll see different options:
- None: No proxy is used.
- Manual: You need to manually enter the proxy server address and port for different protocols (HTTP, HTTPS, FTP, SOCKS).
- Automatic: The system automatically detects the proxy settings using a configuration URL (PAC file).
- Enter Proxy Details: If you choose “Manual”, enter the proxy server address and port for each protocol you want to use with the proxy. For example, you might enter “proxy.example.com” as the HTTP Proxy and “8080” as the Port.
- Authentication (Optional): If your proxy requires authentication, you’ll be prompted to enter your username and password.
- Apply Changes: Click “Apply System-Wide” or a similar button to save your settings. You might be asked for your password to authenticate.
Command-Line Interface (CLI) Method
For users who prefer a more technical approach or need to configure Ubuntu proxy settings on a server without a GUI, the command-line interface (CLI) is the way to go. This method involves editing configuration files directly.
Setting Proxy for apt (Package Manager)
The `apt` package manager needs to be configured separately to use a proxy server. You can do this by creating a configuration file.
- Create a Configuration File: Open a terminal and create a file named `01proxy` in the `/etc/apt/apt.conf.d/` directory using a text editor like `nano` or `vim` with root privileges:
sudo nano /etc/apt/apt.conf.d/01proxy - Add Proxy Settings: Add the following lines to the file, replacing `proxy.example.com` and `8080` with your actual proxy server address and port:
Acquire::http::Proxy "http://proxy.example.com:8080/"; Acquire::https::Proxy "http://proxy.example.com:8080/"; - Save and Close: Save the file and exit the text editor.
- Update apt: Run `sudo apt update` to apply the changes.
Setting Proxy for Environment Variables
Many applications rely on environment variables to determine proxy settings. You can set these variables globally or for a specific user.
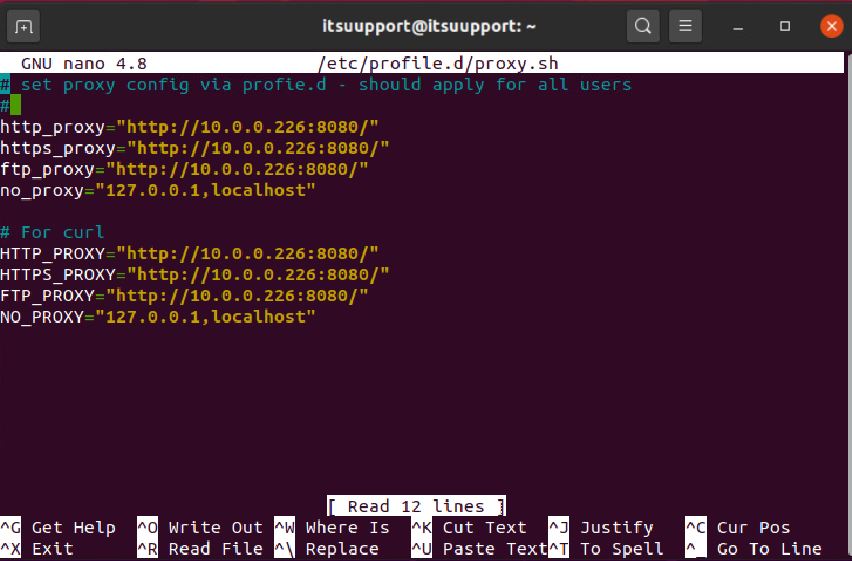
- Edit the Environment File: To set the proxy globally, edit the `/etc/environment` file with root privileges:
sudo nano /etc/environment - Add Proxy Variables: Add the following lines to the file, replacing `proxy.example.com` and `8080` with your actual proxy server address and port:
http_proxy="http://proxy.example.com:8080/"
https_proxy="http://proxy.example.com:8080/"
ftp_proxy="http://proxy.example.com:8080/"
no_proxy="localhost,127.0.0.1,::1"
The `no_proxy` variable specifies a list of hosts or domains that should not be accessed through the proxy.
- Save and Close: Save the file and exit the text editor.
- Apply Changes: Reboot your system or log out and log back in for the changes to take effect. Alternatively, you can source the file by running:
source /etc/environment
To set the proxy for a specific user, edit the `~/.bashrc` or `~/.profile` file in the user’s home directory and add the same environment variables. Remember to source the file or log out and log back in for the changes to take effect.
Using `export` Command (Temporary Setting)
For a temporary proxy setting that only lasts for the current session, you can use the `export` command in the terminal:
export http_proxy="http://proxy.example.com:8080/"
export https_proxy="http://proxy.example.com:8080/"
export ftp_proxy="http://proxy.example.com:8080/"
This method is useful for testing or for situations where you only need to use a proxy temporarily.
Troubleshooting Common Proxy Issues
Even with careful configuration, you might encounter issues with your Ubuntu proxy settings. Here are some common problems and their solutions:
- Connection Refused: This usually indicates that the proxy server is not running or is unreachable. Double-check the proxy server address and port.
- Authentication Errors: Ensure that you’ve entered the correct username and password for the proxy server.
- Website Not Loading: Check if the website is blocked by the proxy server’s access control policies. Also, verify that the proxy settings are correctly configured for the protocol being used (HTTP, HTTPS).
- apt Update Errors: If you’re experiencing issues with `apt update`, double-check the proxy settings in the `/etc/apt/apt.conf.d/01proxy` file.
- Environment Variable Issues: Ensure that the environment variables are correctly set and that you’ve sourced the relevant files or logged out and logged back in for the changes to take effect.
If you’re still having trouble, consult the proxy server’s documentation or contact your network administrator for assistance. [See also: Setting Up a Firewall on Ubuntu]
Advanced Proxy Settings
For more advanced configurations, you might need to explore options like PAC (Proxy Auto-Configuration) files or specific application settings.
PAC Files
A PAC file is a JavaScript file that defines how web browsers and other user agents should automatically choose a proxy server for accessing a particular URL. This is particularly useful in environments with multiple proxy servers or complex routing rules.
To use a PAC file, you simply need to specify the URL of the PAC file in your system’s proxy settings (either through the GUI or by setting the `http_proxy` and `https_proxy` environment variables to point to the PAC file URL).
Application-Specific Proxy Settings
Some applications might have their own proxy settings that override the system-wide settings. For example, web browsers like Firefox and Chrome allow you to configure proxy settings directly within the browser. Check the application’s documentation for details on how to configure its proxy settings.
Security Considerations
When using a proxy server, it’s important to be aware of the security implications. Ensure that the proxy server is reputable and that it uses encryption to protect your data. Avoid using public or untrusted proxy servers, as they might be used to intercept your traffic or inject malicious content. [See also: Best Practices for Ubuntu Security]
Conclusion
Configuring Ubuntu proxy settings is an essential skill for anyone who wants to control their internet access, enhance their security, or bypass geo-restrictions. By understanding the different methods available and following the troubleshooting tips outlined in this guide, you can confidently configure proxy settings on your Ubuntu system and enjoy a seamless online experience. Remember to always prioritize security and choose reputable proxy servers to protect your data. Mastering Ubuntu proxy settings empowers you to navigate the internet with greater control and confidence. Experiment with different configurations to find what works best for your needs, and always stay informed about the latest security best practices. Setting up the correct Ubuntu proxy settings ensures secure internet access. Correct Ubuntu proxy settings are critical. You should test your Ubuntu proxy settings after configuration. Reviewing your Ubuntu proxy settings periodically is a good practice. Configuring Ubuntu proxy settings via command line is possible. The Ubuntu proxy settings can be configured globally. Understand your Ubuntu proxy settings. Properly configured Ubuntu proxy settings are essential for network security.
