How Do I Create a Proxy Server: A Comprehensive Guide
In today’s interconnected digital landscape, understanding network security and privacy is paramount. One effective method to enhance these aspects is by implementing a proxy server. But how do I create a proxy server? This question often arises among individuals and organizations seeking greater control over their internet traffic, improved security, and the ability to bypass geographical restrictions. This comprehensive guide will walk you through the process, providing detailed explanations and practical steps.
Understanding Proxy Servers
Before diving into the creation process, let’s first understand what a proxy server is and why one might want to set one up. A proxy server acts as an intermediary between your device (computer, smartphone, etc.) and the internet. When you send a request to access a website or online service, that request is first routed to the proxy server. The proxy server then forwards the request to the destination server on your behalf. The response from the destination server is sent back to the proxy server, which then relays it back to you.
Benefits of Using a Proxy Server
- Enhanced Security: Proxy servers can mask your IP address, making it more difficult for websites and malicious actors to track your online activity.
- Improved Privacy: By routing your traffic through a proxy server, you can limit the amount of personal information shared with websites and online services.
- Bypassing Geo-Restrictions: Some websites and services are only available in certain geographical locations. A proxy server can allow you to access content from other regions.
- Content Filtering: Proxy servers can be configured to block access to specific websites or types of content, which can be useful for parental control or workplace productivity.
- Caching: Proxy servers can cache frequently accessed content, which can improve website loading times and reduce bandwidth usage.
Methods to Create a Proxy Server
There are several ways to create a proxy server, ranging from using readily available software to setting up a server manually. Here are some common methods:
Using Proxy Server Software
The easiest way to set up a proxy server is by using dedicated software. Several options are available, both free and paid, that simplify the process. Here are a few popular choices:
- CCProxy: A Windows-based proxy server software that is easy to configure and manage. It supports various protocols, including HTTP, HTTPS, FTP, and SOCKS.
- Squid: A highly versatile and widely used open-source proxy server. It runs on various operating systems, including Linux, macOS, and Windows (via Cygwin or WSL).
- Tinyproxy: A lightweight and simple proxy server designed for small networks. It is easy to configure and has minimal resource requirements.
Let’s explore how to set up a proxy server using Squid, as it’s a powerful and commonly used option.
Setting Up a Proxy Server with Squid on Ubuntu
Squid is a popular choice for creating a proxy server due to its flexibility and comprehensive features. Here’s a step-by-step guide on setting up Squid on an Ubuntu server:
Step 1: Update the System
First, update your system’s package list:
sudo apt update
sudo apt upgrade
Step 2: Install Squid
Install the Squid package:
sudo apt install squidStep 3: Configure Squid
The main configuration file for Squid is located at `/etc/squid/squid.conf`. Before making changes, it’s a good practice to back up the original file:
sudo cp /etc/squid/squid.conf /etc/squid/squid.conf.backupNow, open the configuration file using a text editor (e.g., nano or vim):
sudo nano /etc/squid/squid.confFind the `http_access deny all` line and comment it out by adding a `#` at the beginning. Then, add the following lines to allow access from your local network. Replace `192.168.1.0/24` with your network’s IP range:
acl localnet src 192.168.1.0/24
http_access allow localnet
http_access allow localhost
You can also configure the port Squid listens on by modifying the `http_port` directive. The default port is 3128:
http_port 3128Step 4: Restart Squid
After making the changes, save the configuration file and restart the Squid service:
sudo systemctl restart squidStep 5: Verify Squid is Running
Check the status of the Squid service to ensure it’s running correctly:
sudo systemctl status squidIf the service is active and running, you have successfully set up the Squid proxy server.
Manual Configuration (Advanced)
For those seeking a more hands-on approach, setting up a proxy server manually involves configuring a server operating system (e.g., Linux, Windows Server) and installing the necessary software components. This method requires a deeper understanding of networking concepts and server administration.
Choosing a Server Operating System
Select a server operating system that suits your needs and technical expertise. Linux distributions like Ubuntu, CentOS, and Debian are popular choices due to their stability, security, and extensive documentation. Windows Server is another option, especially if you are more familiar with the Windows environment.
Installing and Configuring Proxy Software
Once you have chosen your server operating system, install and configure proxy server software such as Squid, Apache, or Nginx. Each software has its own configuration process, so consult the documentation for detailed instructions.
Configuring Network Settings
Configure the network settings of your server to ensure that it can receive and forward traffic correctly. This involves setting up static IP addresses, configuring firewall rules, and configuring DNS settings.
Connecting to the Proxy Server
Once your proxy server is set up, you need to configure your devices to use it. Here’s how to do it on different platforms:
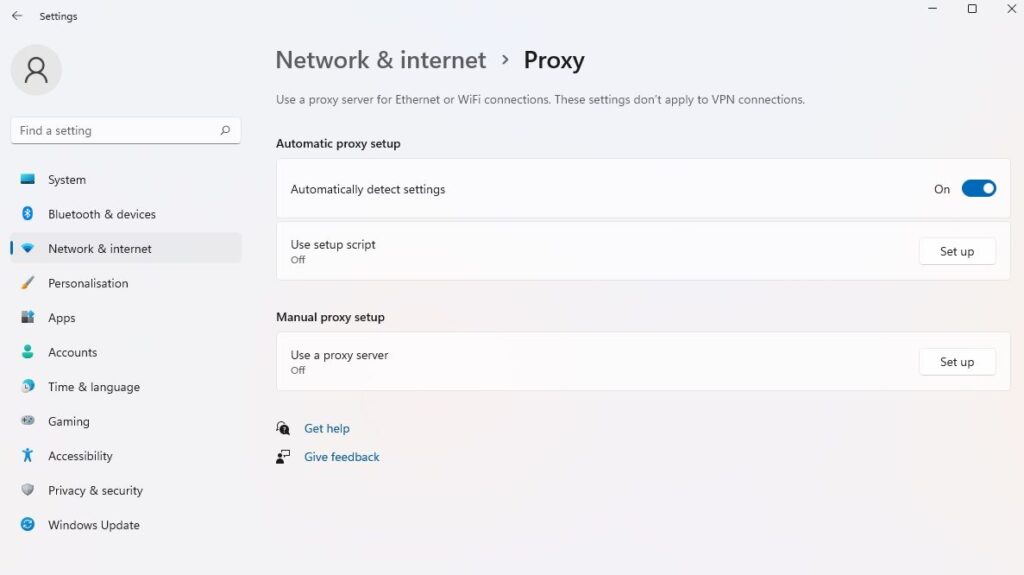
Windows
- Go to Settings > Network & Internet > Proxy.
- Under Manual proxy setup, toggle the “Use a proxy server” switch to On.
- Enter the IP address and port number of your proxy server.
- Click Save.
macOS
- Go to System Preferences > Network.
- Select your network connection (e.g., Wi-Fi or Ethernet).
- Click Advanced.
- Go to the Proxies tab.
- Select the protocol you want to use (e.g., Web Proxy (HTTP) or Secure Web Proxy (HTTPS)).
- Enter the IP address and port number of your proxy server.
- Click OK and then Apply.
Web Browsers
Most web browsers also allow you to configure proxy settings directly. Here’s how to do it in Google Chrome:
- Go to Settings > Advanced > System > Open your computer’s proxy settings.
- This will open your operating system’s proxy settings, where you can configure the proxy server as described above.
Troubleshooting Common Issues
Setting up a proxy server can sometimes be challenging, and you may encounter issues. Here are some common problems and their solutions:
- Connection Refused: This error usually indicates that the proxy server is not running or is not accessible from your network. Check the proxy server’s status and network settings.
- Website Not Loading: This could be due to incorrect proxy settings or a misconfigured proxy server. Double-check your proxy settings and ensure that the proxy server is configured to allow access to the website.
- Slow Performance: Slow performance can be caused by a variety of factors, including a slow internet connection, an overloaded proxy server, or inefficient proxy server configuration. Optimize your proxy server configuration and consider upgrading your internet connection.
Security Considerations
When setting up a proxy server, security should be a top priority. Here are some security considerations to keep in mind:
- Use Strong Passwords: Protect your proxy server with strong, unique passwords to prevent unauthorized access.
- Keep Software Up to Date: Regularly update your proxy server software to patch security vulnerabilities and ensure optimal performance.
- Implement Access Controls: Configure access controls to restrict access to your proxy server to authorized users and networks.
- Monitor Logs: Monitor your proxy server’s logs for suspicious activity and potential security breaches.
- Use HTTPS: Always use HTTPS to encrypt traffic between your devices and the proxy server, as well as between the proxy server and the destination server.
Conclusion
Creating a proxy server can seem daunting, but with the right guidance and tools, it’s an achievable task. Whether you choose to use proxy server software or set up a server manually, understanding the underlying principles and following best practices is crucial. By implementing a proxy server, you can enhance your security, improve your privacy, and gain greater control over your internet experience. Remember to prioritize security and regularly maintain your proxy server to ensure its effectiveness. Hopefully, this guide has answered your question, “how do I create a proxy server?” and provided you with the knowledge to implement your own solution.
Now that you know how do I create a proxy server, you can take the necessary steps to enhance your online security and privacy. Happy proxying!
[See also: Setting Up a VPN for Enhanced Security]
[See also: Understanding Network Security Protocols]
[See also: Best Practices for Online Privacy]
