How to Change to a Static IP Address: A Comprehensive Guide
In the ever-evolving landscape of network administration, understanding how to change to a static IP address is a fundamental skill. Whether you’re a seasoned IT professional or a home user looking to optimize your network performance, this guide provides a comprehensive walkthrough of the process. We’ll cover the ‘why’ behind changing to a static IP, the ‘how’ across various operating systems, and the potential benefits you can expect.
Why Change to a Static IP Address?
Before diving into the technical details, it’s crucial to understand the advantages of changing to a static IP. By default, most devices on a network obtain an IP address dynamically from a DHCP server (usually your router). This means the IP address can change periodically. While this is convenient for most users, it can cause issues for servers, printers, and other devices that need a consistent address.
- Reliability: Static IPs ensure that your devices are always accessible at the same address. This is critical for hosting services or running applications that rely on consistent connections.
- Remote Access: Setting up remote access to your home or office network is significantly easier with a static IP. You won’t have to worry about your IP address changing and breaking your connection.
- Port Forwarding: Many applications and services require port forwarding, which is much simpler to configure with a static IP.
- Gaming: Some online games perform better with a static IP, reducing lag and improving connection stability.
Understanding Dynamic vs. Static IPs
A dynamic IP address is assigned automatically by your router’s DHCP server each time a device connects to the network. This simplifies network management as addresses are allocated and reallocated as needed. However, this also means the IP address can change over time.
A static IP address, on the other hand, is manually configured on a device. It remains constant unless you explicitly change it. This provides stability and predictability, essential for certain applications and services.
How to Change to a Static IP Address on Windows
Changing to a static IP on Windows is a straightforward process. Follow these steps:
- Open Network and Sharing Center: Right-click on the network icon in your system tray and select “Open Network and Sharing Center.”
- Change Adapter Settings: Click on “Change adapter settings” in the left-hand pane.
- Select Your Network Adapter: Right-click on your network adapter (e.g., Ethernet or Wi-Fi) and select “Properties.”
- Internet Protocol Version 4 (TCP/IPv4): Select “Internet Protocol Version 4 (TCP/IPv4)” from the list and click “Properties.”
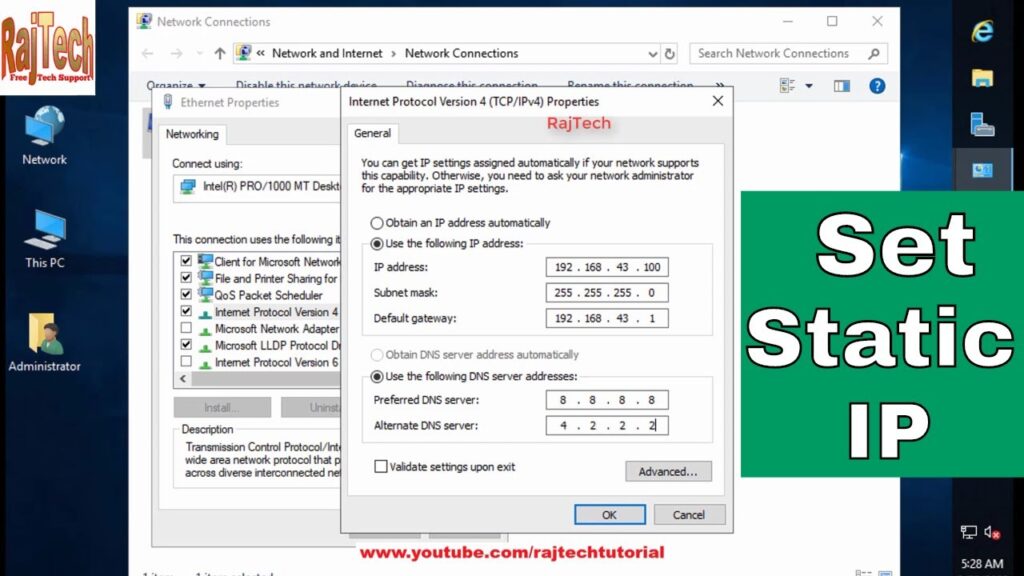
- Enter Static IP Information: Select “Use the following IP address:” and enter the following information:
- IP address: Choose an IP address within your network’s range that is not already in use. A typical range is 192.168.1.2 to 192.168.1.254. It is important to avoid IP addresses already assigned by the DHCP server. Look at the DHCP leases in your router’s configuration to determine what range is available.
- Subnet mask: This is usually 255.255.255.0.
- Default gateway: This is usually your router’s IP address (e.g., 192.168.1.1).
- Preferred DNS server: Use your ISP’s DNS server or a public DNS server like Google’s (8.8.8.8) or Cloudflare’s (1.1.1.1).
- Validate Settings Upon Exit: Check the box that says “Validate settings upon exit”
- Click OK: Click “OK” on all the windows to save your changes.
After completing these steps, your computer will use the static IP address you configured. To verify, open Command Prompt and type `ipconfig` to see your network configuration.
How to Change to a Static IP Address on macOS
Changing to a static IP on macOS is similar to Windows. Here’s how:
- Open System Preferences: Click on the Apple menu and select “System Preferences.”
- Network: Click on the “Network” icon.
- Select Your Network Interface: Select your network interface (e.g., Ethernet or Wi-Fi) from the left-hand pane.
- Advanced: Click on the “Advanced…” button.
- TCP/IP Tab: Select the “TCP/IP” tab.
- Configure IPv4: Change the “Configure IPv4” dropdown to “Manually.”
- Enter Static IP Information: Enter the following information:
- IP Address: Choose an IP address within your network’s range that is not already in use.
- Subnet Mask: This is usually 255.255.255.0.
- Router: This is usually your router’s IP address.
- DNS Tab: Click on the “DNS” tab and add your preferred DNS servers (e.g., 8.8.8.8 and 1.1.1.1).
- Click OK and Apply: Click “OK” and then “Apply” to save your changes.
Once you’ve completed these steps, your Mac will use the static IP address you configured. You can verify this by running `ifconfig` in the Terminal application.
How to Change to a Static IP Address on Linux
Changing to a static IP on Linux can be done through the command line or using a graphical network manager. The exact steps may vary depending on your distribution.
Using NetworkManager (GUI)
- Open Network Settings: Access your network settings, usually through the system tray or settings menu.
- Edit Connection: Select your network connection and click “Edit.”
- IPv4 Settings: Go to the “IPv4 Settings” tab.
- Method: Change the “Method” dropdown to “Manual.”
- Addresses: Add a new address with the following information:
- Address: Choose an IP address within your network’s range that is not already in use.
- Netmask: This is usually 24 (representing 255.255.255.0).
- Gateway: This is usually your router’s IP address.
- DNS Servers: Add your preferred DNS servers (e.g., 8.8.8.8 and 1.1.1.1).
- Save: Save your changes and restart your network connection.
Using Command Line (Terminal)
The command-line method involves editing network configuration files. Here’s a general outline:
- Identify Your Network Interface: Use the `ip addr` or `ifconfig` command to identify your network interface (e.g., eth0 or wlan0).
- Edit Network Configuration File: Open the appropriate network configuration file using a text editor (e.g., `/etc/network/interfaces` on Debian-based systems or `/etc/sysconfig/network-scripts/ifcfg-` on Red Hat-based systems).
- Configure Static IP: Add or modify the following lines in the configuration file:
auto iface inet static address netmask gateway dns-nameservers - Restart Network Service: Restart the network service to apply the changes (e.g., `sudo systemctl restart networking` or `sudo service networking restart`).
Remember to replace “, “, “, “, and ` ` with your actual values.
Finding the Right IP Address for Your Static IP
Choosing the correct IP address for your static IP is important to avoid conflicts on your network. Here’s what to keep in mind:
- IP Address Range: Your static IP address should fall within the same IP address range as your router. Typically, this is 192.168.1.x or 192.168.0.x.
- Avoid DHCP Range: Check your router’s DHCP settings to see what range of IP addresses it automatically assigns. Avoid using an IP address within that range to prevent conflicts.
- Test the IP Address: Before assigning a static IP, ping the address from another device on your network to ensure that it’s not already in use. If you get a response, that IP address is already taken.
Troubleshooting Static IP Issues
Changing to a static IP can sometimes lead to connectivity problems. Here are some common issues and how to resolve them:
- IP Address Conflict: If another device on your network is using the same IP address, you’ll experience connectivity issues. Change the static IP address to an unused one.
- Incorrect Gateway: If the default gateway is incorrect, your device won’t be able to communicate with the internet. Double-check the gateway address in your network settings.
- Incorrect DNS Server: If the DNS server is incorrect, you won’t be able to resolve domain names. Use a public DNS server like Google’s (8.8.8.8) or Cloudflare’s (1.1.1.1).
- Firewall Issues: Ensure that your firewall is not blocking traffic to or from the static IP address.
Security Considerations When Using Static IPs
While static IPs offer convenience and reliability, it’s important to consider the security implications:
- Exposed Services: If you’re running services that are accessible from the internet, a static IP can make them easier to target. Implement appropriate security measures, such as firewalls and intrusion detection systems.
- Tracking: Static IPs can potentially be used to track your online activity. Consider using a VPN to mask your IP address and encrypt your traffic.
Conclusion
Changing to a static IP address is a valuable skill for anyone managing a network. By understanding the benefits, following the correct configuration steps, and addressing potential issues, you can optimize your network performance and ensure the reliability of your devices. Whether you’re using Windows, macOS, or Linux, the process is relatively straightforward. Remember to choose an appropriate IP address, double-check your settings, and consider the security implications.
By following this guide, you should now have a solid understanding of how to change to a static IP. This knowledge will empower you to better manage your network and take advantage of the many benefits that static IPs offer. Understanding how to change to a static IP is a crucial skill for network administrators and home users alike. If you’re looking to improve your network’s reliability and performance, changing to a static IP is an excellent starting point. Remember to always document your changes and keep your network secure.
[See also: Setting Up a Home Network]
[See also: Understanding IP Addresses]
[See also: Troubleshooting Network Connectivity Issues]
