How to Make Your IP Address Static: A Comprehensive Guide
In today’s interconnected world, understanding your IP address and how it works is crucial. Most internet users operate with a dynamic IP address, which changes periodically. However, there are numerous situations where having a static IP address becomes advantageous. This article will provide a comprehensive guide on how to make your IP address static, covering the reasons why you might want one, the different methods available, and the potential benefits and drawbacks.
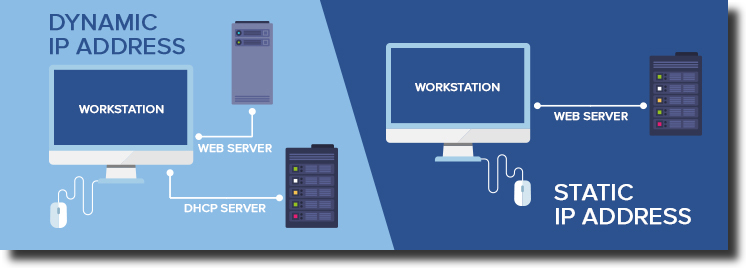
Understanding Dynamic vs. Static IP Addresses
Before diving into the process of how to make your IP address static, it’s essential to understand the difference between dynamic and static IP addresses. An IP address (Internet Protocol address) is a numerical label assigned to each device connected to a computer network that uses the Internet Protocol for communication. Think of it as your device’s unique identifier on the internet.
- Dynamic IP Address: Assigned by your Internet Service Provider (ISP) automatically using DHCP (Dynamic Host Configuration Protocol). It changes periodically, usually when your router is restarted or after a certain lease time. This is the most common type of IP address for residential users.
- Static IP Address: A fixed, unchanging IP address that is manually configured on your device. Once assigned, it remains the same unless you specifically change it.
Why You Might Need a Static IP Address
While dynamic IP addresses work perfectly fine for most everyday internet activities, there are several compelling reasons why you might want to learn how to make your IP address static:
- Hosting a Website or Server: If you’re hosting a website, email server, or game server from your home network, a static IP address is essential. It ensures that users can always access your server using the same address. A dynamic IP would cause frequent disruptions as the address changes.
- Remote Access: Static IP addresses make it easier to access your home network remotely. Whether you’re using remote desktop software or accessing files on a network-attached storage (NAS) device, a static IP provides a consistent point of access.
- Consistent VPN Connection: Some VPN services work more reliably with static IP addresses. If you frequently use a VPN, having a static IP can improve the stability and speed of your connection.
- Security Camera Systems: For remote viewing of security camera footage, a static IP address simplifies the configuration process and ensures continuous access to your cameras.
- Online Gaming: While not always necessary, a static IP can sometimes improve online gaming performance by reducing latency and improving connection stability.
Methods for Making Your IP Address Static
There are two primary methods for how to make your IP address static: configuring it on your router and requesting a static IP from your ISP.
Method 1: Configuring a Static IP Address on Your Router
This method involves assigning a static IP address within your local network. Your router will then reserve that IP address for your specific device. This is often referred to as creating a static DHCP lease or IP reservation.
- Find Your Current IP Address, Subnet Mask, Default Gateway, and DNS Servers:
- Windows: Open Command Prompt and type
ipconfig /all. Note down the IPv4 Address, Subnet Mask, Default Gateway, and DNS Servers. - macOS: Open Terminal and type
ifconfig. Look for the en0 or en1 interface (usually your Wi-Fi or Ethernet adapter). Note down the IP address, Netmask (which is the subnet mask), and Router (which is the default gateway). You can find the DNS servers in System Preferences -> Network -> Advanced -> DNS. - Linux: Open a terminal and type
ip addrorifconfig. Note down the IP address, subnet mask, and gateway. The DNS servers are usually found in/etc/resolv.conf.
- Windows: Open Command Prompt and type
- Access Your Router’s Configuration Page: Open a web browser and enter your router’s IP address (usually 192.168.1.1 or 192.168.0.1) in the address bar. You’ll be prompted to enter your router’s username and password. If you haven’t changed them, check your router’s documentation or the manufacturer’s website for the default credentials.
- Navigate to the DHCP Settings: The location of the DHCP settings varies depending on your router’s make and model. Look for options like “DHCP Server,” “LAN Settings,” or “Network Settings.”
- Find the Static IP Reservation or DHCP Reservation Section: Many routers have a specific section for creating static IP reservations. This section allows you to assign a specific IP address to a device based on its MAC address (Media Access Control address).
- Create a New Reservation:
- Enter the device’s MAC address. You can find the MAC address in your device’s network settings (usually labeled as “Physical Address” or “Hardware Address”).
- Enter the desired static IP address. Choose an IP address within your router’s DHCP range but outside the range it typically assigns dynamically. This avoids conflicts. For example, if your DHCP range is 192.168.1.100 to 192.168.1.200, you could choose 192.168.1.50.
- Enter the device’s hostname (optional).
- Save the settings.
- Configure the Static IP Address on Your Device: Even after creating the reservation on your router, you may need to manually configure the static IP address on your device. This step is sometimes optional, as the router reservation might automatically assign the IP. However, manual configuration ensures the static IP is used.
- Windows: Go to Control Panel -> Network and Internet -> Network and Sharing Center -> Change adapter settings. Right-click on your network adapter (Ethernet or Wi-Fi) and select Properties. Select “Internet Protocol Version 4 (TCP/IPv4)” and click Properties. Select “Use the following IP address” and enter the static IP address, subnet mask, default gateway, and DNS server addresses that you noted down earlier.
- macOS: Go to System Preferences -> Network. Select your network adapter (Wi-Fi or Ethernet) and click Advanced. Go to the TCP/IP tab and select “Manually” from the Configure IPv4 dropdown menu. Enter the static IP address, subnet mask, and router address. Go to the DNS tab and enter the DNS server addresses.
- Linux: The method varies depending on your distribution. You can typically configure the static IP address through the network settings GUI or by editing the network configuration file (e.g.,
/etc/network/interfaceson Debian-based systems).
- Restart Your Device and Router: After configuring the static IP address, restart both your device and your router to ensure the changes take effect.
Method 2: Requesting a Static IP Address from Your ISP
The other option for how to make your IP address static is to request one directly from your Internet Service Provider (ISP). This usually involves an additional monthly fee, as static IP addresses are typically offered as part of a business-class internet service.
- Contact Your ISP: Call your ISP’s customer support or visit their website to inquire about static IP address options.
- Inquire About Pricing and Availability: Ask about the monthly cost for a static IP address and whether it’s available in your area.
- Provide Necessary Information: Your ISP will likely require your account information and the MAC address of your router or device.
- Configure Your Router: Once your ISP assigns you a static IP address, they will provide you with the IP address, subnet mask, default gateway, and DNS server addresses. You’ll need to configure these settings on your router, similar to the manual configuration described in Method 1.
Benefits of Using a Static IP Address
- Reliable Remote Access: As mentioned earlier, a static IP address provides a consistent point of access for remote connections.
- Simplified Server Hosting: Hosting a website or server becomes much easier with a static IP address.
- Improved VPN Stability: Static IP addresses can enhance the stability and performance of VPN connections.
- Consistent DNS Records: A static IP address allows you to create consistent DNS records, ensuring that your domain name always points to the correct server.
Drawbacks of Using a Static IP Address
- Security Risks: A static IP address can make your network more vulnerable to hacking attempts, as it provides a fixed target for attackers. However, this risk can be mitigated with proper security measures, such as firewalls and intrusion detection systems.
- Potential Cost: Requesting a static IP address from your ISP usually involves an additional monthly fee.
- Configuration Complexity: Manually configuring a static IP address can be more complex than using a dynamic IP address.
Security Considerations
When learning how to make your IP address static, remember that security is paramount. Always use strong passwords for your router and devices. Enable a firewall to protect your network from unauthorized access. Keep your router’s firmware up to date to patch any security vulnerabilities. Consider using a reputable antivirus and anti-malware software on your devices. [See also: Securing Your Home Network] Additionally, regularly monitor your network traffic for any suspicious activity.
Conclusion
Understanding how to make your IP address static is a valuable skill for anyone who hosts servers, requires reliable remote access, or wants to improve their VPN connection. While there are potential security risks and costs associated with static IP addresses, the benefits often outweigh the drawbacks for many users. By following the steps outlined in this guide, you can successfully configure a static IP address and enjoy the advantages it offers.
Whether you choose to configure a static IP address on your router or request one from your ISP, carefully consider your needs and security requirements. With proper planning and configuration, a static IP address can significantly enhance your internet experience.
