Mastering Bicycle Disc Brakes: A Comprehensive Guide to Adjusting and Maintaining Performance
Bicycle disc brakes have revolutionized cycling, offering superior stopping power and reliability compared to traditional rim brakes, especially in wet or muddy conditions. However, like any mechanical system, they require regular maintenance and occasional adjustments to ensure optimal performance. This comprehensive guide will walk you through the process of adjusting bicycle disc brakes, troubleshooting common issues, and keeping your brakes in top condition for safe and enjoyable rides.
Whether you’re a seasoned cyclist or a weekend rider, understanding how to properly adjust bicycle disc brakes is a valuable skill. Incorrectly adjusted brakes can lead to reduced braking power, noisy operation, and premature wear of components. By following these steps, you can confidently maintain your bicycle disc brakes and avoid costly repairs.
Understanding Bicycle Disc Brake Systems
Before diving into the adjustment process, it’s essential to understand the different types of bicycle disc brakes and their components. Disc brakes generally fall into two categories: mechanical and hydraulic.
Mechanical Disc Brakes
Mechanical disc brakes use a cable to actuate the brake caliper. When you pull the brake lever, the cable pulls on the caliper arm, which in turn pushes the brake pads against the rotor. Mechanical disc brakes are relatively simple to maintain and are often found on entry-level to mid-range bicycles. However, they typically offer less stopping power and require more frequent adjustments compared to hydraulic systems.
Hydraulic Disc Brakes
Hydraulic disc brakes use a fluid-filled system to transmit force from the brake lever to the caliper. When you pull the lever, it pushes fluid through the brake lines, which in turn pushes the pistons in the caliper, pressing the brake pads against the rotor. Hydraulic disc brakes offer superior stopping power, modulation, and require less maintenance than mechanical systems. They are commonly found on higher-end bicycles and mountain bikes.
Key Components of Disc Brakes
- Brake Lever: The lever that you pull to activate the brakes.
- Brake Caliper: The housing that contains the brake pads and pistons.
- Brake Pads: The friction material that contacts the rotor to slow down the wheel.
- Rotor (Disc): The metal disc attached to the wheel hub that the brake pads clamp onto.
- Brake Lines (Hydraulic): The hoses that carry the brake fluid from the lever to the caliper.
- Brake Cables (Mechanical): The cables that connect the brake lever to the caliper.
Tools You’ll Need
Before you begin adjusting bicycle disc brakes, gather the necessary tools:
- Allen wrenches (various sizes)
- Torque wrench
- Brake cleaner
- Clean rags
- Rotor truing tool (optional)
- Pad spacer or thin piece of cardboard
Adjusting Mechanical Disc Brakes: Step-by-Step Guide
Adjusting bicycle disc brakes, specifically mechanical ones, requires a systematic approach. Follow these steps:
- Inspect the Brake Pads: Check the brake pads for wear. If they are worn down to the minimum thickness indicator, replace them.
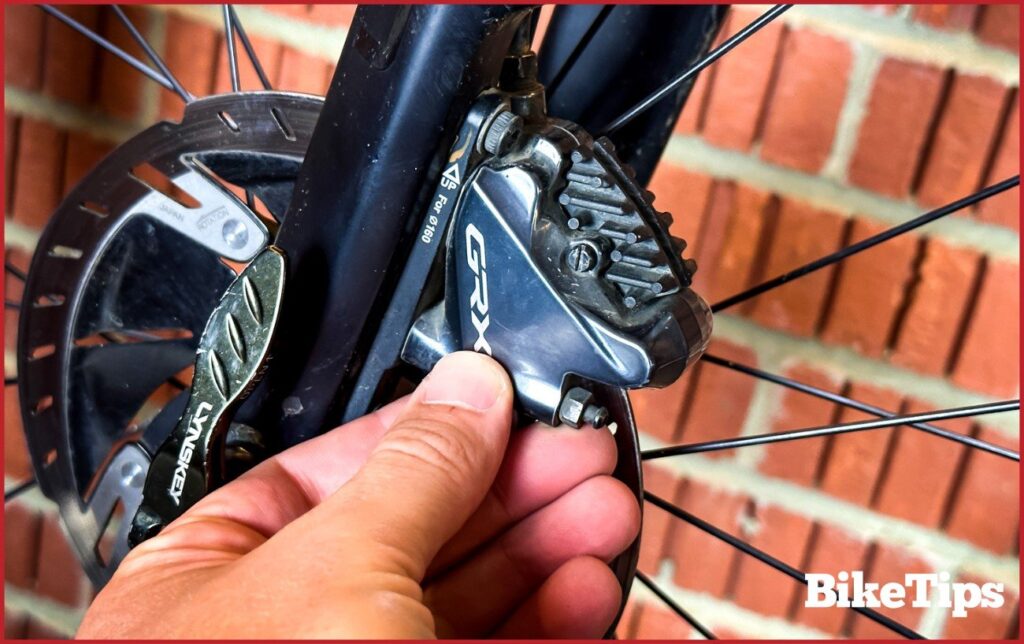
- Loosen the Caliper Bolts: Slightly loosen the bolts that attach the caliper to the frame or fork. This allows you to reposition the caliper.
- Center the Caliper: Squeeze the brake lever and hold it. While holding the lever, tighten the caliper bolts. This helps center the caliper over the rotor.
- Adjust the Pad Clearance: Most mechanical disc brakes have an adjustment knob or barrel adjuster on the caliper. Use this to adjust the pad clearance. The goal is to have the pads close enough to the rotor to provide good braking power, but not so close that they rub when the wheel is spinning freely.
- Fine-Tune with Barrel Adjuster: Use the barrel adjuster on the brake lever to fine-tune the cable tension. Turning the adjuster clockwise increases tension, while turning it counter-clockwise decreases tension.
- Test the Brakes: Spin the wheel and apply the brakes. Make sure the wheel stops smoothly and without excessive noise. If the brakes feel spongy or weak, double-check the cable tension and pad clearance.
Adjusting Hydraulic Disc Brakes: Step-by-Step Guide
Hydraulic disc brakes generally require less frequent adjusting bicycle disc brakes intervention than mechanical brakes, but occasional adjustments may still be necessary. Here’s how to do it:
- Inspect the Brake Pads: As with mechanical brakes, check the brake pads for wear. Replace them if necessary.
- Check for Leaks: Inspect the brake lines, caliper, and lever for any signs of fluid leaks. If you find a leak, address it immediately, as it can compromise braking performance.
- Center the Caliper: Loosen the caliper bolts slightly. Spin the wheel and look at the gap between the rotor and the brake pads on both sides. Adjust the caliper position until the gap is even on both sides. Tighten the caliper bolts to the manufacturer’s specified torque.
- Bleed the Brakes (if necessary): If the brakes feel spongy or lack power, there may be air in the brake lines. Bleeding the brakes removes air bubbles and restores proper braking performance. This process requires a bleed kit specific to your brake system. [See also: How to Bleed Hydraulic Disc Brakes]
- Adjust Lever Reach (if desired): Many hydraulic brake levers have a reach adjustment feature that allows you to customize the distance between the lever and the handlebar. Adjust this to your preference for optimal comfort and control.
- Test the Brakes: Spin the wheel and apply the brakes. Make sure the wheel stops smoothly and without excessive noise. If the brakes still feel spongy after bleeding, repeat the bleeding process.
Troubleshooting Common Disc Brake Issues
Even with proper adjusting bicycle disc brakes techniques, you may encounter some common issues. Here’s how to troubleshoot them:
Noisy Brakes
Noisy brakes can be caused by several factors:
- Contaminated Pads or Rotor: Oil, grease, or other contaminants on the pads or rotor can cause squealing. Clean the rotor with brake cleaner and replace the pads if necessary.
- Misaligned Caliper: A misaligned caliper can cause the pads to rub against the rotor, creating noise. Re-center the caliper as described above.
- Worn Pads: Worn pads can also cause noise. Replace the pads if they are worn down to the minimum thickness indicator.
- Rotor Issues: A bent or warped rotor can cause noise and vibration. Use a rotor truing tool to straighten the rotor. If the rotor is severely damaged, replace it.
Spongy Brakes
Spongy brakes are usually caused by air in the brake lines (hydraulic brakes) or excessive cable stretch (mechanical brakes).
- Bleed the Brakes (Hydraulic): Bleeding the brakes removes air bubbles and restores proper braking performance.
- Adjust Cable Tension (Mechanical): Tighten the cable tension using the barrel adjuster on the brake lever. If the cable is excessively stretched, replace it.
Weak Braking Power
Weak braking power can be caused by several factors:
- Worn Pads: Replace the pads if they are worn down to the minimum thickness indicator.
- Contaminated Pads or Rotor: Clean the rotor with brake cleaner and replace the pads if necessary.
- Air in Brake Lines (Hydraulic): Bleed the brakes to remove air bubbles.
- Cable Issues (Mechanical): Check the cable for fraying or damage. Replace the cable if necessary. Ensure the cable housing is properly seated in the cable stops.
Rotor Rubbing
Rotor rubbing can be annoying and can lead to premature wear of the pads and rotor.
- Misaligned Caliper: Re-center the caliper as described above.
- Bent Rotor: Use a rotor truing tool to straighten the rotor.
- Loose Wheel: Ensure the wheel is properly seated in the dropouts and that the axle is tightened securely.
Preventative Maintenance for Bicycle Disc Brakes
Regular preventative maintenance is key to keeping your bicycle disc brakes in top condition. Here are some tips:
- Inspect Regularly: Inspect your brakes regularly for wear, damage, and leaks.
- Clean Regularly: Clean your brakes regularly with brake cleaner to remove dirt, grime, and contaminants.
- Replace Pads When Necessary: Replace your brake pads when they are worn down to the minimum thickness indicator.
- Bleed Brakes Annually (Hydraulic): Bleed your hydraulic brakes annually to remove air bubbles and maintain optimal performance.
- Lubricate Cables (Mechanical): Lubricate your brake cables regularly to ensure smooth operation.
- Check Rotor Trueness: Check your rotor for trueness periodically and straighten it if necessary.
Conclusion
Adjusting bicycle disc brakes is a crucial skill for any cyclist who wants to maintain their bike and ensure safe and reliable braking performance. By understanding the different types of disc brakes, following the adjustment steps outlined in this guide, and performing regular preventative maintenance, you can keep your brakes in top condition for years to come. Remember to always prioritize safety and consult a qualified mechanic if you are unsure about any aspect of brake maintenance or adjusting bicycle disc brakes.
