Where to Find IP Address on Nintendo Switch: A Comprehensive Guide
Understanding your Nintendo Switch’s IP address can be crucial for various networking tasks, from setting up port forwarding for improved online gaming to troubleshooting connectivity issues. Finding your IP address on a Nintendo Switch isn’t immediately obvious, but this comprehensive guide will walk you through the process step-by-step. Whether you’re a tech novice or a seasoned gamer, knowing where to find IP address on Nintendo Switch can enhance your gaming experience. Let’s dive in and explore how to locate this essential network information.
Why You Might Need Your Nintendo Switch IP Address
Before we get into the how-to, let’s discuss why you might need to know your Nintendo Switch’s IP address. Here are a few common scenarios:
- Port Forwarding: Some games require specific ports to be open on your router to ensure optimal online play. Knowing your Switch’s IP address is essential for configuring port forwarding rules.
- Troubleshooting Network Issues: If you’re experiencing connectivity problems, your IP address can help you diagnose potential conflicts or issues with your network configuration.
- Setting Up a Static IP Address: A static IP address can provide a more stable connection for your Switch, preventing it from changing and potentially disrupting online gameplay.
- Advanced Network Configuration: For users with more complex network setups, the IP address is a fundamental piece of information for managing your home network.
Steps to Find Your Nintendo Switch IP Address
The Nintendo Switch doesn’t directly display its IP address in an easily accessible menu. Instead, you’ll need to navigate through the system settings. Here’s how:
Accessing System Settings
- Turn on your Nintendo Switch: Ensure your console is powered on and you are on the home screen.
- Navigate to System Settings: On the home screen, scroll through the icons at the bottom until you find the “System Settings” icon. It looks like a gear. Select it by pressing the A button.
Finding the Internet Settings
- Select “Internet”: In the System Settings menu, scroll down to find the “Internet” option. Select it.
- Choose “Internet Settings”: Within the Internet menu, select “Internet Settings.” The Switch will begin searching for available Wi-Fi networks.
Viewing Connection Status
- Select Your Connected Network: Choose the Wi-Fi network your Nintendo Switch is currently connected to. It will likely have a green checkmark next to it.
- Select “Connection Status”: After selecting your network, a new menu will appear. Choose “Connection Status.”
Locating the IP Address
In the Connection Status screen, you will find a wealth of information about your network connection, including:
- IP Address: This is the IP address assigned to your Nintendo Switch by your router. It will be displayed in the standard IPv4 format (e.g., 192.168.1.10).
- MAC Address: This is the unique hardware address of your Switch’s network adapter.
- Gateway: This is the IP address of your router.
- DNS: These are the DNS server addresses used by your Switch.
This is where to find IP address on Nintendo Switch. Make a note of the IP Address, as you’ll need it for any network configurations you plan to make.
Understanding IP Addresses: Dynamic vs. Static
It’s important to understand the difference between dynamic and static IP addresses. By default, most home networks use dynamic IP addresses, meaning your Switch’s IP address can change periodically. This is managed by your router’s DHCP server.
A static IP address, on the other hand, is manually assigned and remains constant. Setting up a static IP address for your Nintendo Switch can be beneficial for consistent online performance, especially when port forwarding.
Setting Up a Static IP Address (Advanced)
If you decide to set up a static IP address, follow these steps. Note: Incorrectly configuring static IP settings can cause network connectivity issues, so proceed with caution.
- Gather Necessary Information: Before you begin, you’ll need the following information:
- IP Address: Choose an IP address within your network’s range but outside the DHCP range (check your router’s settings to determine this). For example, if your router’s IP address is 192.168.1.1 and its DHCP range is 192.168.1.2 to 192.168.1.254, you could use 192.168.1.250.
- Subnet Mask: Typically 255.255.255.0 for most home networks.
- Gateway: The IP address of your router (e.g., 192.168.1.1).
- DNS: You can use your ISP’s DNS servers or public DNS servers like Google’s (8.8.8.8 and 8.8.4.4).
- Navigate to Internet Settings: Follow the steps outlined earlier to access the Internet Settings menu on your Nintendo Switch.
- Select Your Connected Network: Choose your Wi-Fi network.
- Select “Change Settings”: Instead of “Connection Status,” select “Change Settings.”
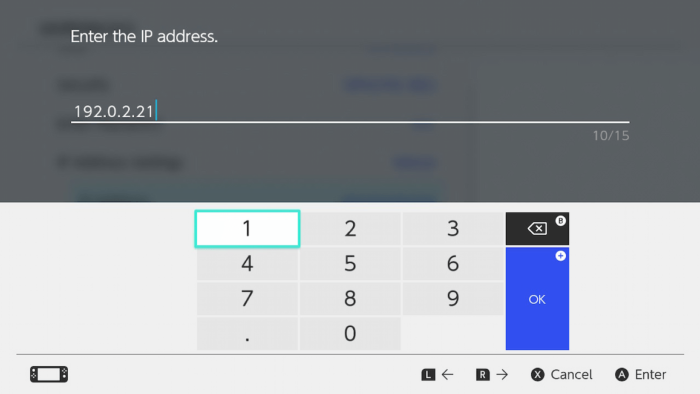
- IP Address Settings: Change “IP Address Settings” from “Automatic” to “Manual.”
- Enter Your Static IP Information: Enter the IP address, subnet mask, gateway, and DNS information you gathered in step 1.
- Save Your Settings: Select “Save” to apply the changes. Your Switch will attempt to connect to the network using the new static IP address.
Troubleshooting Common IP Address Issues
Sometimes, you might encounter issues related to your Nintendo Switch’s IP address. Here are a few common problems and how to troubleshoot them:
- IP Address Conflict: If two devices on your network have the same IP address, it can cause connectivity issues. If you suspect an IP address conflict, try restarting your router and your Nintendo Switch. If you’ve assigned a static IP, make sure it doesn’t conflict with an existing device.
- Unable to Obtain IP Address: If your Switch is unable to obtain an IP address from your router, check your router’s DHCP settings and ensure that DHCP is enabled. Also, make sure your Switch is within range of your Wi-Fi network.
- Slow Connection Speed: While not directly related to the IP address itself, a congested network or weak Wi-Fi signal can affect your Switch’s online performance. Try moving your Switch closer to your router or upgrading your internet plan.
Other Ways to Enhance Your Nintendo Switch Online Experience
Beyond understanding where to find IP address on Nintendo Switch and managing your network settings, there are other ways to enhance your online gaming experience:
- Use a Wired Connection: If possible, consider using a wired Ethernet connection instead of Wi-Fi for a more stable and faster connection. You’ll need a USB-to-Ethernet adapter for your Nintendo Switch.
- Optimize Your Router Settings: Explore your router’s settings to optimize performance for gaming. This might include enabling QoS (Quality of Service) to prioritize gaming traffic or adjusting Wi-Fi channel settings.
- Keep Your Switch Updated: Regularly update your Nintendo Switch’s system software to ensure you have the latest performance improvements and security patches.
Conclusion
Knowing where to find IP address on Nintendo Switch is a fundamental skill for any serious gamer. Whether you’re configuring port forwarding, troubleshooting network issues, or setting up a static IP address, this information is essential for optimizing your online gaming experience. By following the steps outlined in this guide, you can easily locate your Switch’s IP address and take control of your network settings. Remember to proceed with caution when making changes to your network configuration, and always consult your router’s manual for specific instructions.
By mastering these techniques, you’ll be well-equipped to enjoy a smoother, more reliable online gaming experience on your Nintendo Switch. Happy gaming! Understanding where to find IP address on Nintendo Switch is just the beginning – explore further and unlock the full potential of your console’s online capabilities.
Where to find IP address on Nintendo Switch is a question many users have, and hopefully, this guide has provided a clear and concise answer. With this knowledge, you can now confidently tackle various network-related tasks and enhance your gaming sessions. Remember that knowing where to find IP address on Nintendo Switch is a valuable tool in your gaming arsenal.
[See also: Nintendo Switch Online Subscription Guide]
[See also: Best Nintendo Switch Accessories]
[See also: Troubleshooting Nintendo Switch Connectivity Issues]
