How to Change to a Static IP Address: A Comprehensive Guide
In the ever-expanding realm of networking, understanding IP addresses is crucial. Whether you’re a seasoned IT professional or a home user seeking more control over your network, knowing how to change to a static IP address can be incredibly beneficial. This comprehensive guide will walk you through the process, explaining the ‘why’ and ‘how’ of static IP addresses, ensuring you have the knowledge to confidently manage your network settings.
Understanding IP Addresses: Dynamic vs. Static
Before diving into the process of how to change to a static IP address, it’s essential to grasp the difference between dynamic and static IP addresses.
Dynamic IP Addresses: These are assigned automatically by your Internet Service Provider (ISP) using DHCP (Dynamic Host Configuration Protocol). Every time your device connects to the network, it may receive a different IP address. This is the default setting for most home users, as it simplifies network management for the ISP.
Static IP Addresses: A static IP address, on the other hand, is manually configured and remains constant unless you change it. This provides a consistent address for your device on the network. There are several reasons why you might want to change to a static IP address, which we’ll explore next.
Why Change to a Static IP Address?
While dynamic IPs work well for general internet browsing, static IP addresses offer several advantages:
- Consistent Access: Ideal for hosting servers (web, email, game) or running applications that require a stable address.
- Remote Access: Simplifies remote access to your computer or network devices.
- Reliable VPN Connections: Static IPs can improve the reliability of VPN connections.
- Easier Troubleshooting: Makes it easier to identify and troubleshoot network issues.
- Static DNS Records: Required for setting up custom DNS records for domains.
Preparing to Change to a Static IP Address
Before you change to a static IP address, you’ll need to gather some information. This usually involves accessing your router’s configuration page.
Gathering Necessary Information
- IP Address: Choose an IP address within your network’s range, but outside the DHCP range. This prevents conflicts with dynamically assigned addresses. A good strategy is to choose an address that is numerically higher than the DHCP range.
- Subnet Mask: This defines the network size. The most common subnet mask for home networks is 255.255.255.0.
- Default Gateway: This is the IP address of your router, which allows your device to communicate with the internet.
- Preferred DNS Server: The IP address of the DNS server your device will use to resolve domain names. Common options include Google’s DNS (8.8.8.8 and 8.8.4.4) and Cloudflare’s DNS (1.1.1.1 and 1.0.0.1).
- Alternate DNS Server: A backup DNS server in case the preferred one is unavailable.
You can find this information by accessing your router’s configuration page. Typically, you can do this by typing your router’s IP address (usually 192.168.1.1 or 192.168.0.1) into your web browser. You may need to enter your router’s username and password to access the settings. If you don’t know the router’s IP, password or username, consult your router’s manual, or search on the internet for the default settings of your router’s brand and model.
Steps to Change to a Static IP Address on Windows
Here’s how to change to a static IP address on a Windows computer:
- Open Network Connections: Right-click on the network icon in the system tray (usually in the bottom-right corner of your screen) and select “Open Network & Internet settings”. Alternatively, search for “Control Panel” in the Start menu, open it, and then navigate to “Network and Internet” > “Network and Sharing Center” > “Change adapter settings”.
- Select Your Network Adapter: Right-click on your active network adapter (e.g., Ethernet or Wi-Fi) and select “Properties”.
- Internet Protocol Version 4 (TCP/IPv4): In the list of items, find and select “Internet Protocol Version 4 (TCP/IPv4)” and click on the “Properties” button.
- Enter Static IP Information: Select “Use the following IP address:”. Now, enter the IP address, subnet mask, default gateway, preferred DNS server, and alternate DNS server that you gathered earlier.
- Validate Settings Upon Exit: (Optional) Check the box that says “Validate settings upon exit”. This will run a diagnostic test when you close the window to verify that the settings are working correctly.
- Click OK: Click “OK” on both the TCP/IPv4 Properties window and the Network Adapter Properties window to save your changes.
Steps to Change to a Static IP Address on macOS
Here’s how to change to a static IP address on a macOS computer:
- Open System Preferences: Click on the Apple menu in the top-left corner of your screen and select “System Preferences”.
- Network: Click on the “Network” icon.
- Select Your Network Interface: Select your active network interface (e.g., Ethernet or Wi-Fi) from the list on the left.
- Advanced: Click on the “Advanced…” button.
- TCP/IP Tab: Click on the “TCP/IP” tab.
- Configure IPv4: From the “Configure IPv4” dropdown menu, select “Manually”.
- Enter Static IP Information: Enter the IP address, subnet mask, and router (default gateway) that you gathered earlier.
- DNS Tab: Click on the “DNS” tab and add your preferred and alternate DNS server addresses using the “+” button.
- Apply Changes: Click “OK” and then “Apply” to save your changes.
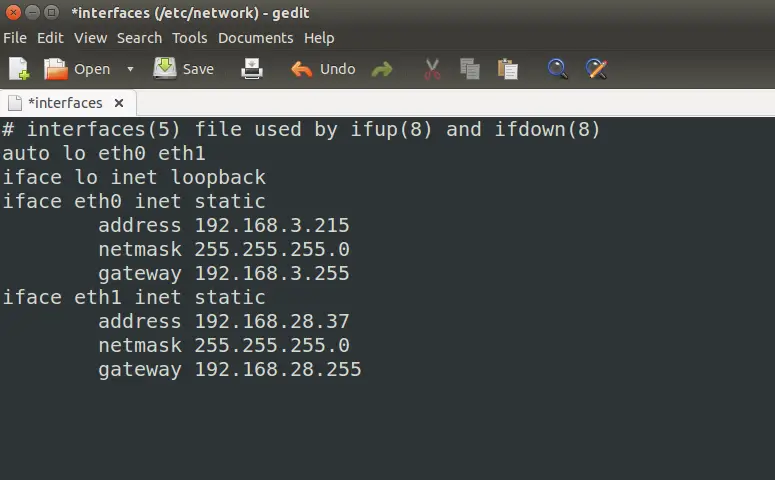
Steps to Change to a Static IP Address on Linux
The process of how to change to a static IP address on Linux can vary depending on the distribution and desktop environment you’re using. Here’s a general guide using the command line, which should work across most distributions:
- Identify Your Network Interface: Open a terminal and use the command `ip addr` or `ifconfig` to identify your network interface name (e.g., eth0, wlan0, enp0s3).
- Edit the Network Configuration File: Use a text editor (like nano or vim) with root privileges to edit the network configuration file. The location of this file can vary, but it’s often in `/etc/network/interfaces` or `/etc/netplan/`. For example, using nano: `sudo nano /etc/network/interfaces`.
- Configure the Interface: Add or modify the configuration for your network interface. Here’s an example configuration for `/etc/network/interfaces`:
auto eth0
iface eth0 inet static
 address 192.168.1.100
 netmask 255.255.255.0
 gateway 192.168.1.1
 dns-nameservers 8.8.8.8 8.8.4.4
Replace `eth0` with your interface name, and the IP address, netmask, gateway, and DNS servers with the values you gathered earlier.
- Save the File: Save the changes to the configuration file.
- Restart Networking: Restart the networking service to apply the changes. You can do this with the command `sudo systemctl restart networking` or `sudo /etc/init.d/networking restart`.
Troubleshooting Common Issues
Sometimes, after you change to a static IP address, you might encounter issues. Here are some common problems and how to troubleshoot them:
- Internet Connectivity Issues: Double-check that you’ve entered the correct IP address, subnet mask, default gateway, and DNS server addresses. A simple typo can prevent your device from connecting to the internet.
- IP Address Conflicts: If another device on your network is already using the IP address you’ve assigned, you’ll experience connectivity issues. Choose a different IP address outside the DHCP range.
- Incorrect DNS Settings: If you can access websites by IP address but not by domain name, the problem is likely with your DNS settings. Verify that you’ve entered the correct DNS server addresses.
- Router Issues: If you’re still having problems, try restarting your router. This can often resolve temporary network glitches.
Security Considerations
While using a static IP address can offer benefits, it’s essential to be aware of the security implications. Static IPs can make your device or network slightly more vulnerable to attacks, as they provide a fixed target for malicious actors. To mitigate this risk, ensure that your firewall is properly configured and that you’re using strong passwords for your router and other network devices. Keep your operating system and software up to date with the latest security patches.
Conclusion
Knowing how to change to a static IP address empowers you to take control of your network settings and optimize your online experience. Whether you’re hosting a home server, setting up remote access, or simply seeking more reliable network connections, understanding and implementing static IP addresses can be a valuable skill. By following the steps outlined in this guide and taking the necessary precautions, you can confidently manage your network and enjoy the benefits of a static IP address.
Hopefully, this guide has illuminated how to change to a static IP address effectively. Remember to double-check your settings and consult your router’s documentation if you encounter any difficulties. With practice, managing your network settings will become second nature. [See also: Setting up a Home Network], [See also: Troubleshooting Network Connectivity Issues], [See also: Understanding IP Addresses]
