How to Remove Silicone from Your Bathtub: A Comprehensive Guide
Silicone sealant is a fantastic material for creating a watertight seal around your bathtub, preventing leaks and water damage. However, over time, silicone can degrade, become discolored, or simply need replacing. Removing old silicone from a bathtub can seem daunting, but with the right tools and techniques, it’s a manageable DIY project. This guide provides a step-by-step approach to effectively remove silicone from bathtub surfaces, ensuring a clean slate for reapplication.
Why Remove Silicone from Your Bathtub?
Several reasons might prompt you to remove silicone from bathtub areas:
- Mold and Mildew: Silicone is susceptible to mold and mildew growth, especially in humid environments. Even with regular cleaning, stains can become ingrained, making removal the best option.
- Degradation: Over time, silicone can become brittle, cracked, or peel away from the surface. This compromises its effectiveness as a sealant.
- Aesthetic Reasons: Discolored or unsightly silicone can detract from the overall appearance of your bathroom. Replacing it with fresh sealant can significantly improve the look.
- Re-tiling or Renovations: If you’re re-tiling your bathroom, you’ll need to remove silicone from bathtub edges and surrounding areas to ensure a proper bond with the new tiles.
Tools and Materials You’ll Need
Before you begin, gather the necessary tools and materials. Having everything on hand will streamline the process and prevent unnecessary interruptions:
- Silicone Removal Tool or Utility Knife: A specialized silicone removal tool is designed to safely and effectively cut through silicone without damaging the underlying surface. A sharp utility knife can also be used, but requires more caution.
- Scraper: A plastic or metal scraper will help remove stubborn silicone residue. Avoid using overly abrasive scrapers that could scratch the bathtub surface.
- Silicone Softener/Remover: Chemical silicone softeners or removers can significantly ease the removal process, especially for older, hardened silicone.
- Clean Cloths or Paper Towels: For wiping away residue and cleaning the surface.
- Spray Bottle with Water: To wet the area and aid in cleaning.
- White Vinegar or Isopropyl Alcohol: These can help dissolve remaining silicone residue.
- Protective Gloves: To protect your hands from chemicals and sharp tools.
- Safety Glasses: To protect your eyes from splashes and debris.
- Vacuum Cleaner (Optional): To quickly remove loose silicone debris.
Step-by-Step Guide to Removing Silicone
Follow these steps to safely and effectively remove silicone from bathtub areas:
Step 1: Prepare the Area
Start by ventilating the bathroom. Open windows and turn on the exhaust fan to ensure proper airflow. This is especially important if you’re using chemical silicone removers. Protect the surrounding surfaces with masking tape if desired. This can prevent accidental scratches or damage.
Step 2: Soften the Silicone (Optional but Recommended)
Apply a silicone softener or remover according to the manufacturer’s instructions. These products typically come in a gel or spray form. Allow the softener to sit for the recommended time, usually 15-30 minutes. This will help break down the silicone’s adhesive bond, making it easier to remove silicone from bathtub edges. The use of a silicone softener is highly recommended for older or particularly stubborn silicone.
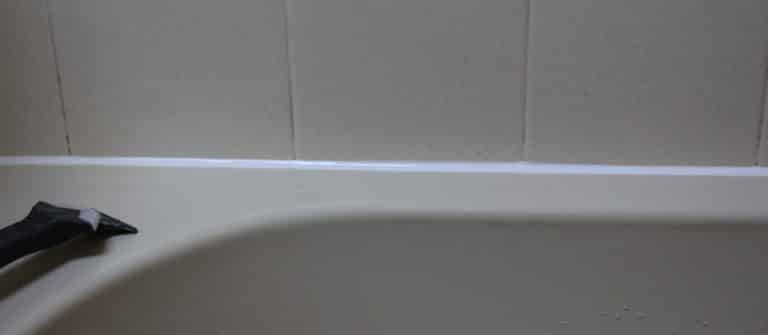
Step 3: Cut Through the Silicone
Using a silicone removal tool or a sharp utility knife, carefully cut along both edges of the silicone bead. Apply steady pressure and avoid digging into the bathtub or tile surface. The goal is to separate the silicone from the adjacent surfaces. If using a utility knife, hold it at a low angle to minimize the risk of scratching the tub. Multiple shallow cuts are better than trying to force a single deep cut.
Step 4: Remove the Silicone Strips
Once you’ve cut along both edges, try to peel away the silicone strips. You may be able to grab an edge with your fingers or use pliers to gently pull the silicone away. If the silicone is particularly stubborn, you may need to use the scraper to help lift it. Work slowly and carefully to avoid leaving behind excessive residue.
Step 5: Scrape Away Remaining Residue
After removing the bulk of the silicone, you’ll likely be left with some residue. Use a plastic or metal scraper to carefully scrape away any remaining silicone. Hold the scraper at a low angle and apply steady pressure. Be patient and avoid using excessive force, which could damage the surface. For particularly stubborn residue, try reapplying the silicone softener and letting it sit for a few more minutes.
Step 6: Clean the Surface
Once you’ve removed all visible silicone residue, clean the area thoroughly. Spray the surface with water and wipe it down with a clean cloth or paper towel. Next, apply white vinegar or isopropyl alcohol to the area and let it sit for a few minutes. This will help dissolve any remaining silicone particles and disinfect the surface. Finally, wipe the area clean and dry it thoroughly. A clean, dry surface is essential for proper adhesion of new silicone sealant.
Step 7: Inspect and Repeat (If Necessary)
Carefully inspect the area to ensure that all silicone has been removed. If you find any remaining residue, repeat steps 5 and 6. It’s important to remove all traces of old silicone before applying new sealant to ensure a strong and watertight bond. Taking the time to thoroughly clean the surface will pay off in the long run.
Tips for Easier Silicone Removal
- Work in a Well-Ventilated Area: Proper ventilation is crucial, especially when using chemical silicone removers.
- Use the Right Tools: A specialized silicone removal tool can make the job much easier and safer.
- Be Patient: Removing silicone can be time-consuming, especially if it’s old or hardened. Avoid rushing the process, as this can lead to mistakes and damage.
- Apply Heat: Applying heat from a hairdryer can sometimes soften the silicone and make it easier to remove. Be careful not to overheat the surface.
- Consider Professional Help: If you’re struggling to remove silicone from bathtub areas, or if you’re concerned about damaging the surface, consider hiring a professional.
Preventing Future Silicone Problems
Once you’ve successfully remove silicone from bathtub and reapplied new sealant, there are steps you can take to prevent future problems:
- Regular Cleaning: Clean the silicone regularly with a mild soap and water solution to prevent mold and mildew growth.
- Proper Ventilation: Ensure proper ventilation in the bathroom to reduce humidity.
- Choose High-Quality Silicone: Use a high-quality, mold-resistant silicone sealant.
- Reapply as Needed: Inspect the silicone regularly and reapply it as needed to maintain a watertight seal.
Troubleshooting Common Issues
Even with careful planning, you might encounter some common issues when you remove silicone from bathtub areas:
- Silicone is Too Hard to Remove: Apply more silicone softener and let it sit for a longer period. You can also try applying heat with a hairdryer.
- Scratches on the Bathtub Surface: Use a less abrasive scraper or try applying a polishing compound to remove minor scratches.
- Silicone Residue Won’t Come Off: Try using a stronger solvent, such as mineral spirits, but be sure to test it in an inconspicuous area first to ensure it doesn’t damage the surface.
- New Silicone Won’t Adhere: Make sure the surface is completely clean and dry before applying the new silicone. You may also need to prime the surface with a silicone primer.
Removing old silicone from your bathtub is a straightforward process that can significantly improve the appearance and functionality of your bathroom. By following these steps and using the right tools, you can successfully remove silicone from bathtub areas and ensure a clean, watertight seal for years to come. Remember to prioritize safety and take your time to avoid damaging the underlying surfaces. Good luck!
[See also: How to Choose the Right Bathtub Sealant]
[See also: DIY Bathroom Renovation Tips]
[See also: Preventing Mold Growth in Your Bathroom]
