How to Replace Your Bicycle Brake Lever: A Comprehensive Guide
Replacing a bicycle brake lever might seem daunting, but with the right tools and a bit of patience, it’s a straightforward process that can save you money and keep your bike in top condition. Whether your current lever is damaged, worn out, or you simply want to upgrade, this guide will walk you through each step, ensuring a successful replace brake lever bicycle experience. We’ll cover everything from identifying the correct replacement to fine-tuning your brakes after installation. Understanding how to replace brake lever bicycle components is an essential skill for any cyclist.
Why Replace Your Bicycle Brake Lever?
There are several reasons why you might need to replace brake lever bicycle parts. Here are a few common scenarios:
- Damage from a crash: Accidents happen, and brake levers are often the first point of impact.
- Wear and tear: Over time, levers can become loose, corroded, or simply wear out from frequent use.
- Upgrading: You might want to switch to a higher-quality lever for better performance or ergonomics.
- Compatibility: Sometimes, you may need to replace brake lever bicycle parts to ensure compatibility with new brake calipers or shifters.
Tools and Materials Needed
Before you begin, gather the necessary tools and materials. Having everything ready will make the process smoother and more efficient. To replace brake lever bicycle components, you’ll need:
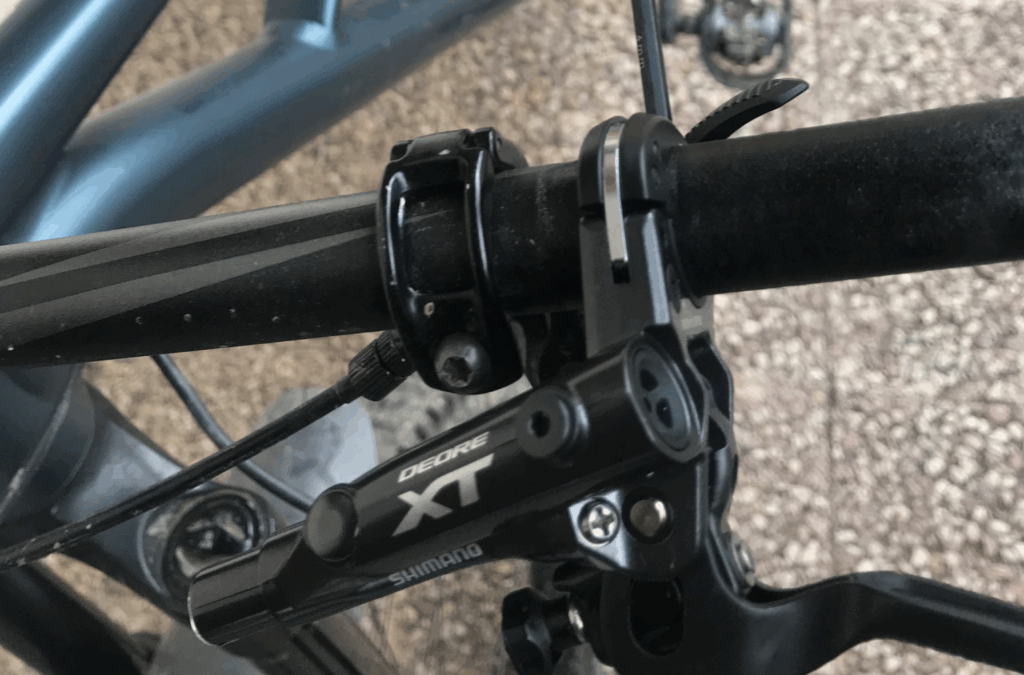
- New brake lever: Ensure it’s compatible with your bike’s brake system (e.g., V-brakes, cantilever brakes, disc brakes).
- Allen wrench set: Various sizes are needed to loosen and tighten bolts.
- Cable cutter: For cleanly cutting the brake cable.
- Pliers: For gripping and manipulating the brake cable.
- Screwdriver: Depending on your brake lever model.
- Brake cable and housing (optional): If the old cable is frayed or corroded, replace it.
- Cable end crimp: To prevent the cable from fraying.
- Lubricant: For smooth cable movement.
- Work gloves: To protect your hands.
- Clean rags: For wiping away grease and dirt.
Step-by-Step Guide to Replacing Your Bicycle Brake Lever
Step Prepare Your Workspace
Set up a clean and well-lit workspace. Place your bike in a repair stand if you have one, or lean it against a stable surface. This will make it easier to access the brake levers and work comfortably. Before you replace brake lever bicycle parts, ensure the bike is stable.
Step Remove the Old Brake Lever
- Loosen the brake cable: Use an Allen wrench to loosen the bolt that secures the brake cable to the brake caliper. This will release the tension on the cable.
- Disconnect the brake cable: Carefully pull the brake cable out of the lever. If the cable is frayed, use pliers to gently guide it out.
- Remove the old lever: Use an Allen wrench or screwdriver to loosen the bolt that secures the brake lever to the handlebar. Slide the old lever off the handlebar.
If the old lever is particularly stubborn, try applying a bit of penetrating oil to the bolt and let it sit for a few minutes before attempting to remove it. This can help loosen any corrosion or buildup.
Step Install the New Brake Lever
- Position the new lever: Slide the new brake lever onto the handlebar in the desired position. Make sure it’s comfortable and easily accessible while riding.
- Tighten the lever: Use an Allen wrench or screwdriver to tighten the bolt that secures the new brake lever to the handlebar. Don’t overtighten it; just make sure it’s snug and won’t move during riding.
- Attach the brake cable: Insert the brake cable into the new lever. Make sure it’s properly seated and aligned.
- Tighten the brake cable: Use an Allen wrench to tighten the bolt that secures the brake cable to the brake caliper. Adjust the tension on the cable so that the brakes engage properly.
When attaching the brake cable, make sure it’s routed correctly through the cable housing. This will ensure smooth and efficient braking. You might need to trim the cable housing to the correct length for optimal performance. This is a crucial step when you replace brake lever bicycle components.
Step Adjust the Brakes
After installing the new brake lever, it’s essential to adjust the brakes to ensure they function correctly. Here’s how:
- Check brake lever travel: The lever should not travel too far before the brakes engage. If it does, tighten the brake cable.
- Check brake pad clearance: The brake pads should be close to the rim or rotor but not rubbing when the brakes are not engaged. Adjust the brake pad position if necessary.
- Test the brakes: Squeeze the brake levers firmly to ensure the brakes engage smoothly and effectively. Make sure there is no slippage or unusual noise.
Proper brake adjustment is critical for safety. If you’re not comfortable adjusting the brakes yourself, take your bike to a professional mechanic. Ensuring your brakes are properly adjusted after you replace brake lever bicycle parts is paramount.
Troubleshooting Common Issues
Sometimes, you might encounter issues during or after replacing your bicycle brake lever. Here are some common problems and how to address them:
- Brake lever feels spongy: This could be due to air in the brake lines (especially with hydraulic brakes) or a loose brake cable. Bleed the brakes or tighten the cable.
- Brakes are rubbing: This could be due to misaligned brake pads or a warped rotor. Adjust the brake pad position or straighten the rotor.
- Brake lever is difficult to pull: This could be due to a corroded brake cable or housing. Replace the cable and housing.
- Brake lever doesn’t return to its original position: This could be due to a sticky pivot point on the lever. Lubricate the pivot point with a light oil.
Addressing these issues promptly will ensure your brakes function correctly and safely after you replace brake lever bicycle parts.
Maintaining Your Bicycle Brake Levers
Regular maintenance can extend the life of your brake levers and ensure they function optimally. Here are some tips:
- Clean the levers regularly: Wipe away dirt and grime with a clean rag.
- Lubricate the pivot points: Apply a light oil to the pivot points to keep them moving smoothly.
- Inspect the cables and housing: Check for fraying or corrosion and replace them as needed.
- Adjust the brakes regularly: Ensure the brake pads are properly aligned and the brake cable tension is correct.
By following these maintenance tips, you can keep your brake levers in good condition and ensure safe and reliable braking performance. Knowing how to properly replace brake lever bicycle components and maintain them is key to cycling safety.
Choosing the Right Replacement Brake Lever
Selecting the correct replacement brake lever is crucial for ensuring compatibility and optimal performance. Consider the following factors:
- Brake type: Ensure the lever is compatible with your bike’s brake system (e.g., V-brakes, cantilever brakes, disc brakes).
- Handlebar diameter: Check the handlebar diameter to ensure the lever fits properly.
- Ergonomics: Choose a lever that feels comfortable in your hand and is easy to reach.
- Material: Levers are typically made from aluminum or carbon fiber. Aluminum levers are more durable and affordable, while carbon fiber levers are lighter and more expensive.
- Brand and quality: Choose a reputable brand known for producing high-quality brake levers.
Taking these factors into account will help you choose the right replacement brake lever for your bike. It’s important to replace brake lever bicycle parts with components that match your bike’s specifications.
The Importance of Proper Braking
Proper braking is essential for safe cycling. Regularly inspect your brakes and ensure they are functioning correctly. If you notice any issues, address them promptly. Knowing how to replace brake lever bicycle components and maintain them is a vital part of responsible cycling. Always test your brakes before each ride to ensure they are in good working order. If you are ever unsure about your ability to safely maintain or repair your bike’s braking system, consult a qualified bicycle mechanic. Your safety is paramount.
[See also: Bicycle Brake Maintenance Tips]
[See also: Understanding Bicycle Brake Systems]
Conclusion
Replacing a bicycle brake lever is a manageable task for most cyclists with the right tools and knowledge. By following this comprehensive guide, you can confidently replace brake lever bicycle parts and keep your bike in optimal condition. Remember to prioritize safety and consult a professional if you encounter any difficulties. Happy cycling!
