How to Set a Proxy Server on Windows: A Comprehensive Guide
In today’s interconnected world, online privacy and security are paramount. One effective way to enhance your digital safety and access geo-restricted content is by using a proxy server. This guide provides a comprehensive walkthrough on how to set a proxy server on Windows, ensuring you can navigate the internet with greater control and anonymity.
A proxy server acts as an intermediary between your computer and the internet. Instead of directly connecting to websites, your traffic is routed through the proxy server, which then forwards your requests. This masks your IP address, making it harder for websites to track your location and activity. Understanding how to set a proxy server on Windows is a valuable skill for anyone concerned about their online footprint.
Understanding Proxy Servers
Before diving into the technical steps, let’s clarify what a proxy server is and why you might want to use one. Essentially, a proxy server is a computer that sits between your device and the internet. When you request data from a website, your request goes through the proxy server first. The proxy server then forwards the request to the website and sends the response back to you. This process offers several benefits, including enhanced security, improved privacy, and access to geographically restricted content.
There are several types of proxy servers, including HTTP, HTTPS, SOCKS4, and SOCKS5. Each type offers different levels of security and compatibility. HTTP proxies are commonly used for web browsing, while HTTPS proxies provide an encrypted connection. SOCKS proxies are more versatile and can handle various types of traffic. Choosing the right type of proxy depends on your specific needs and the level of security you require.
Why Use a Proxy Server on Windows?
There are several compelling reasons to set a proxy server on Windows:
- Enhanced Privacy: Proxies mask your IP address, making it harder for websites to track your location and browsing habits.
- Improved Security: Some proxies offer additional security features, such as malware scanning and content filtering.
- Access Geo-Restricted Content: By connecting through a proxy server in a different location, you can bypass geographical restrictions and access content that might otherwise be unavailable.
- Bypass Censorship: In regions with strict internet censorship, proxies can help you access blocked websites and services.
- Load Balancing: In corporate environments, proxies can distribute network traffic to prevent overload and improve performance.
By learning how to set a proxy server on Windows, you are taking a proactive step towards securing your online activities and accessing a wider range of content.
Methods to Set a Proxy Server on Windows
Windows offers several ways to set a proxy server, each with its own advantages and disadvantages. Here are the most common methods:
Using the Windows Settings App
The simplest way to set a proxy server on Windows is through the Settings app. This method is user-friendly and suitable for most users.
- Open the Settings app by pressing Windows key + I.
- Click on Network & Internet.
- Select Proxy from the left sidebar.
- Under Manual proxy setup, toggle the Use a proxy server switch to On.
- Enter the Address and Port of your proxy server. Your proxy provider will supply these details.
- If required, check the Don’t use the proxy server for local (intranet) addresses box.
- Click Save.
Once you’ve completed these steps, your Windows system will route all internet traffic through the specified proxy server. To disable the proxy, simply toggle the Use a proxy server switch back to Off.
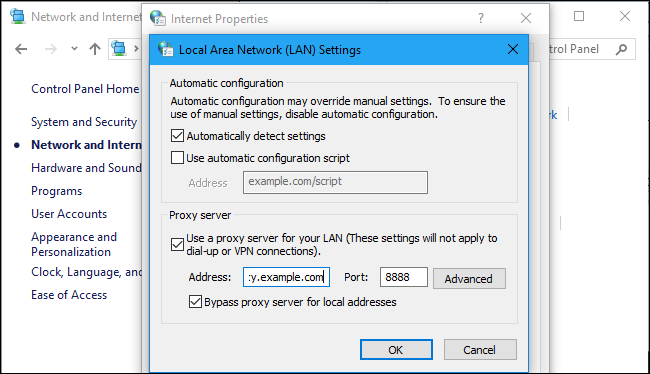
Using the Internet Options Control Panel
Another way to set a proxy server on Windows is through the Internet Options control panel. This method is slightly more technical but offers more advanced configuration options. [See also: Configuring Internet Options in Windows]
- Open the Control Panel. You can search for it in the Start menu.
- Click on Network and Internet, then Internet Options.
- In the Internet Properties window, go to the Connections tab.
- Click on LAN settings.
- Check the box labeled Use a proxy server for your LAN.
- Enter the Address and Port of your proxy server.
- If required, check the Bypass proxy server for local addresses box.
- Click OK on all open windows to save the changes.
This method provides similar functionality to the Settings app, but it also allows you to configure exceptions for specific websites or IP addresses that should not use the proxy server.
Using Command Prompt
For advanced users, the Command Prompt offers a powerful way to set a proxy server on Windows. This method is particularly useful for scripting and automating proxy configuration.
- Open Command Prompt as an administrator.
- Use the following command to set a proxy server:
netsh winhttp set proxy proxy-server="your_proxy_address:your_proxy_port" bypass-list="<local>"
Replaceyour_proxy_addresswith the address of your proxy server andyour_proxy_portwith the port number. - To disable the proxy, use the following command:
netsh winhttp reset proxy
The Command Prompt method is more complex than the other methods, but it offers greater flexibility and control over proxy settings. It’s essential to understand the commands and their effects before using this method.
Using PowerShell
PowerShell provides another command-line interface to set a proxy server on Windows. This method is similar to the Command Prompt method but offers more advanced scripting capabilities. [See also: PowerShell Scripting for Network Configuration]
- Open PowerShell as an administrator.
- Use the following command to set a proxy server:
Set-ItemProperty -Path 'HKCU:SoftwareMicrosoftWindowsCurrentVersionInternet Settings' -name ProxyEnable -Value 1
Set-ItemProperty -Path 'HKCU:SoftwareMicrosoftWindowsCurrentVersionInternet Settings' -name ProxyServer -Value 'your_proxy_address:your_proxy_port'
Replaceyour_proxy_addresswith the address of your proxy server andyour_proxy_portwith the port number. - To disable the proxy, use the following command:
Set-ItemProperty -Path 'HKCU:SoftwareMicrosoftWindowsCurrentVersionInternet Settings' -name ProxyEnable -Value 0
PowerShell offers a more robust and flexible way to manage proxy settings compared to the Command Prompt. It’s particularly useful for automating proxy configuration in enterprise environments.
Troubleshooting Proxy Server Issues
Sometimes, you might encounter issues when trying to set a proxy server on Windows. Here are some common problems and their solutions:
- Cannot connect to the internet: Double-check the proxy server address and port number. Ensure that the proxy server is online and accessible.
- Websites not loading correctly: Clear your browser’s cache and cookies. Try using a different browser to see if the issue persists.
- Proxy server requires authentication: Enter your username and password when prompted. If you don’t have these credentials, contact your proxy provider.
- Proxy server is too slow: Choose a proxy server that is closer to your location or has a faster connection speed.
- Proxy settings keep reverting: Ensure that no other programs or policies are overriding your proxy settings.
By addressing these common issues, you can ensure a smooth and reliable proxy server experience on Windows.
Choosing the Right Proxy Server
Selecting the right proxy server is crucial for achieving your desired level of privacy and security. Here are some factors to consider:
- Type of proxy: Choose the type of proxy that best suits your needs (HTTP, HTTPS, SOCKS4, SOCKS5).
- Location: Select a proxy server in a location that allows you to access the content you need.
- Speed: Opt for a proxy server with a fast connection speed to avoid performance issues.
- Security: Choose a proxy server that offers strong security features, such as encryption and malware scanning.
- Reputation: Research the proxy provider to ensure they have a good reputation and are trustworthy.
By carefully considering these factors, you can choose a proxy server that meets your specific requirements and provides a reliable and secure browsing experience.
Conclusion
Knowing how to set a proxy server on Windows is an essential skill for anyone who values online privacy, security, and accessibility. By following the methods outlined in this guide, you can easily configure your Windows system to route your internet traffic through a proxy server. Whether you’re using the Settings app, the Internet Options control panel, the Command Prompt, or PowerShell, you now have the knowledge and tools to take control of your online experience.
Remember to choose a proxy server that meets your specific needs and to troubleshoot any issues that may arise. With the right proxy server and configuration, you can enjoy a safer, more private, and more accessible internet experience on your Windows device. Understanding how to properly set a proxy server on Windows empowers you to navigate the digital world with confidence and control.
