Mastering Bicycle Maintenance: How to Adjust Your Disc Brakes for Optimal Performance
Bicycle disc brakes offer superior stopping power and consistent performance in various weather conditions, making them a popular choice for modern bikes. However, like all mechanical systems, they require occasional adjustments to maintain optimal functionality. This guide provides a comprehensive overview of adjusting bicycle disc brakes, ensuring your safety and enhancing your riding experience. Whether you’re a seasoned cyclist or a beginner, understanding how to properly adjust bicycle disc brakes is an essential skill. Let’s dive in and explore the intricacies of this crucial maintenance task.
Understanding the Basics of Disc Brakes
Before we delve into the adjustment process, it’s crucial to understand the different types of disc brakes and their components. There are primarily two types: mechanical and hydraulic. Mechanical disc brakes use a cable to actuate the brake caliper, while hydraulic disc brakes use fluid pressure. Both systems offer excellent stopping power, but they require different adjustment techniques.
Mechanical Disc Brakes
Mechanical disc brakes are relatively simple to maintain and adjust. They consist of a brake lever, cable, caliper, and rotor. When you pull the brake lever, the cable pulls the caliper arm, which in turn presses the brake pads against the rotor, slowing down or stopping the wheel. Common issues with mechanical disc brakes include cable stretch, pad wear, and caliper misalignment.
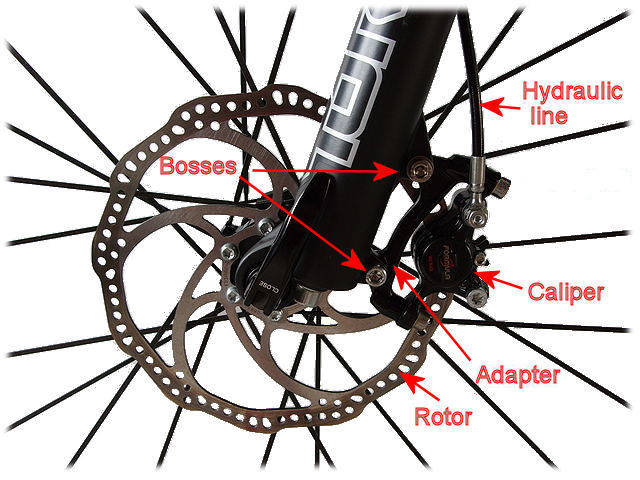
Hydraulic Disc Brakes
Hydraulic disc brakes offer more consistent performance and require less maintenance than mechanical systems. They consist of a brake lever, hose, caliper, and rotor. When you pull the brake lever, it pushes fluid through the hose to the caliper, which then presses the brake pads against the rotor. Hydraulic systems are sealed, so they require less frequent adjusting, but they may need bleeding to remove air bubbles.
Tools You’ll Need
Before you start adjusting your bicycle disc brakes, gather the necessary tools. Having the right equipment will make the process smoother and more efficient. Here’s a list of essential tools:
- Allen wrench set
- Torque wrench
- Cable cutter (for mechanical brakes)
- Brake cleaner
- Rotor truing tool (optional)
- Work stand (optional but recommended)
Adjusting Mechanical Disc Brakes: A Step-by-Step Guide
Adjusting mechanical disc brakes involves several steps, each crucial for ensuring optimal performance. Follow these steps carefully to achieve the best results.
Step 1: Inspect the Brake Pads
Start by inspecting the brake pads for wear. If the pads are worn down to the minimum thickness indicated by the manufacturer, replace them. Worn pads can damage the rotor and reduce braking performance. [See also: Replacing Bike Brake Pads]
Step 2: Check the Cable Tension
Cable tension is critical for proper brake function. If the cable is too loose, the brake lever will have excessive travel before engaging the brakes. If it’s too tight, the brakes may drag. To adjust the cable tension, use the barrel adjuster located on the brake lever or the caliper. Turn the adjuster clockwise to tighten the cable and counterclockwise to loosen it.
Step 3: Center the Caliper
The caliper needs to be centered over the rotor to ensure even pad wear and prevent rubbing. Loosen the caliper mounting bolts slightly and spin the wheel. Observe the gap between the rotor and the pads on both sides. Gently nudge the caliper until the gap is equal on both sides. Tighten the mounting bolts to the manufacturer’s specified torque. This is a key step in adjusting bicycle disc brakes.
Step 4: Fine-Tune the Pad Clearance
Even after centering the caliper, one pad might be closer to the rotor than the other. Many mechanical disc brakes have an independent pad adjustment mechanism. Use an Allen wrench to adjust the pad closer to or farther from the rotor. Aim for a small, equal gap between the pads and the rotor.
Step 5: Test the Brakes
After making the adjustments, test the brakes thoroughly. Spin the wheel and apply the brakes. Ensure that the brakes engage smoothly and provide adequate stopping power. Listen for any rubbing or squealing sounds. If you hear noise, recheck the caliper alignment and pad clearance. It’s important to ensure proper functionality when adjusting bicycle disc brakes.
Adjusting Hydraulic Disc Brakes: A Step-by-Step Guide
Hydraulic disc brakes require less frequent adjusting than mechanical systems, but they may occasionally need attention. Here’s how to adjust them:
Step 1: Inspect the Brake Pads
As with mechanical brakes, start by inspecting the brake pads for wear. Replace them if necessary. [See also: Identifying Worn Brake Pads]
Step 2: Check for Leaks
Inspect the brake lines, calipers, and levers for any signs of fluid leaks. Leaks can compromise braking performance and require immediate attention. If you find a leak, consult a professional mechanic.
Step 3: Center the Caliper
Centering the caliper is crucial for hydraulic disc brakes as well. Loosen the caliper mounting bolts slightly and spin the wheel. Observe the gap between the rotor and the pads. Gently nudge the caliper until the gap is equal on both sides. Tighten the mounting bolts to the manufacturer’s specified torque. This ensures even wear when adjusting bicycle disc brakes.
Step 4: Bleed the Brakes (If Necessary)
If the brake lever feels spongy or lacks power, there may be air in the hydraulic system. Bleeding the brakes removes air bubbles and restores proper function. This process requires a bleed kit and specific instructions for your brake model. If you’re not comfortable bleeding the brakes yourself, seek professional assistance.
Step 5: Test the Brakes
After making the adjustments, test the brakes thoroughly. Ensure that the brake lever feels firm and provides adequate stopping power. Listen for any unusual noises. If the brakes still feel spongy after bleeding, there may be a more significant issue requiring professional attention.
Troubleshooting Common Disc Brake Problems
Even with proper adjusting, you may encounter common disc brake problems. Here are some troubleshooting tips:
Brake Rubbing
If the brakes are rubbing against the rotor, it could be due to caliper misalignment, a bent rotor, or warped pads. Try recentering the caliper first. If the rubbing persists, use a rotor truing tool to straighten the rotor. If the pads are warped, replace them.
Squealing Brakes
Squealing brakes can be caused by contaminated pads, a dirty rotor, or vibrations. Clean the rotor and pads with brake cleaner. If the squealing continues, try bedding in the pads by performing several hard stops. [See also: Eliminating Brake Squeal]
Spongy Brake Lever
A spongy brake lever indicates air in the hydraulic system. Bleed the brakes to remove the air. If the lever remains spongy after bleeding, there may be a leak or other issue requiring professional attention.
Preventative Maintenance Tips
To keep your bicycle disc brakes in top condition, follow these preventative maintenance tips:
- Regularly inspect the brake pads and replace them when necessary.
- Clean the rotor and pads with brake cleaner to remove dirt and contaminants.
- Check the cable tension (for mechanical brakes) and adjust as needed.
- Inspect the brake lines and calipers for leaks (for hydraulic brakes).
- Bleed the brakes periodically to maintain optimal performance (for hydraulic brakes).
The Importance of Professional Maintenance
While many brake adjustments can be performed at home, some issues require professional attention. If you’re not comfortable working on your brakes or if you encounter a problem you can’t resolve, consult a qualified bicycle mechanic. They have the expertise and tools to diagnose and repair complex brake issues, ensuring your safety on the road. Correctly adjusting bicycle disc brakes is vital for safety, and sometimes professional help is the best option.
Conclusion
Adjusting bicycle disc brakes is a crucial maintenance task that ensures your safety and enhances your riding experience. By understanding the different types of disc brakes, following the step-by-step adjustment guides, and performing regular maintenance, you can keep your brakes in top condition. Remember to prioritize safety and seek professional assistance when needed. With proper care and attention, your bicycle disc brakes will provide reliable stopping power for years to come. Mastering the art of adjusting bicycle disc brakes empowers you to maintain your bike effectively and enjoy a safer, more enjoyable ride. Remember to always double-check your work and test your brakes thoroughly before hitting the road. The ability to properly adjust bicycle disc brakes is a valuable skill for any cyclist. Consistent attention to your brakes is key to safe cycling. When adjusting bicycle disc brakes, take your time and follow instructions carefully. Regular maintenance, including adjusting bicycle disc brakes, will extend the life of your bike. If you’re unsure about adjusting bicycle disc brakes, seek professional help. Properly adjust bicycle disc brakes to avoid accidents and injuries. Keep your bike in top shape by adjusting bicycle disc brakes regularly. This knowledge about adjusting bicycle disc brakes will serve you well. Make sure your bicycle is safe by adjusting bicycle disc brakes. This guide will help you in adjusting bicycle disc brakes. Keep adjusting bicycle disc brakes at the top of your mind.
