Mastering macOS Proxy Settings: A Comprehensive Guide
In today’s interconnected world, understanding and managing your network settings is crucial for both security and performance. One key aspect of network configuration is the use of proxies. Whether you’re looking to enhance your privacy, bypass geographical restrictions, or improve network efficiency, configuring macOS proxy settings can be a game-changer. This comprehensive guide will walk you through everything you need to know about macOS proxy settings, from understanding what a proxy is to configuring it on your Mac.
Understanding Proxies: The Basics
Before diving into the specifics of macOS proxy settings, it’s important to understand what a proxy server is and how it works. In simple terms, a proxy server acts as an intermediary between your computer and the internet. When you request a website or online resource, your request is first routed through the proxy server, which then forwards the request to the destination server. The response from the destination server is then sent back to the proxy server, which relays it to your computer.
There are several reasons why you might want to use a proxy server:
- Privacy: Proxies can mask your IP address, making it more difficult for websites and online services to track your online activity.
- Security: Some proxies offer additional security features, such as malware scanning and content filtering.
- Bypassing Restrictions: Proxies can be used to bypass geographical restrictions or access content that is blocked in your region.
- Improved Performance: Proxies can cache frequently accessed content, reducing bandwidth usage and improving network performance.
Types of Proxy Servers
There are several different types of proxy servers, each with its own set of features and benefits. Here are some of the most common types:
- HTTP Proxy: This is the most common type of proxy server, used for web browsing. It handles HTTP requests and responses.
- HTTPS Proxy: Similar to an HTTP proxy, but it handles encrypted HTTPS traffic, providing an extra layer of security.
- SOCKS Proxy: A more versatile type of proxy that can handle various types of traffic, including HTTP, HTTPS, FTP, and more.
- Transparent Proxy: A proxy that doesn’t modify the requests or responses, often used by organizations to monitor internet usage.
- Anonymous Proxy: A proxy that hides your IP address and other identifying information, providing a higher level of privacy.
- Distorting Proxy: A proxy that identifies itself as a proxy but provides incorrect information about your IP address.
Configuring macOS Proxy Settings: A Step-by-Step Guide
Now that you understand the basics of proxy servers, let’s dive into how to configure macOS proxy settings on your Mac. The process is relatively straightforward, but it’s important to follow the steps carefully to ensure that your proxy settings are configured correctly.
Accessing Network Preferences
- Click on the Apple menu in the top-left corner of your screen.
- Select “System Preferences.”
- Click on “Network.”
Selecting Your Network Connection
- In the Network window, select the network connection you want to configure. This could be Wi-Fi or Ethernet, depending on how you connect to the internet.
- Click on the “Advanced” button.
Configuring Proxy Settings
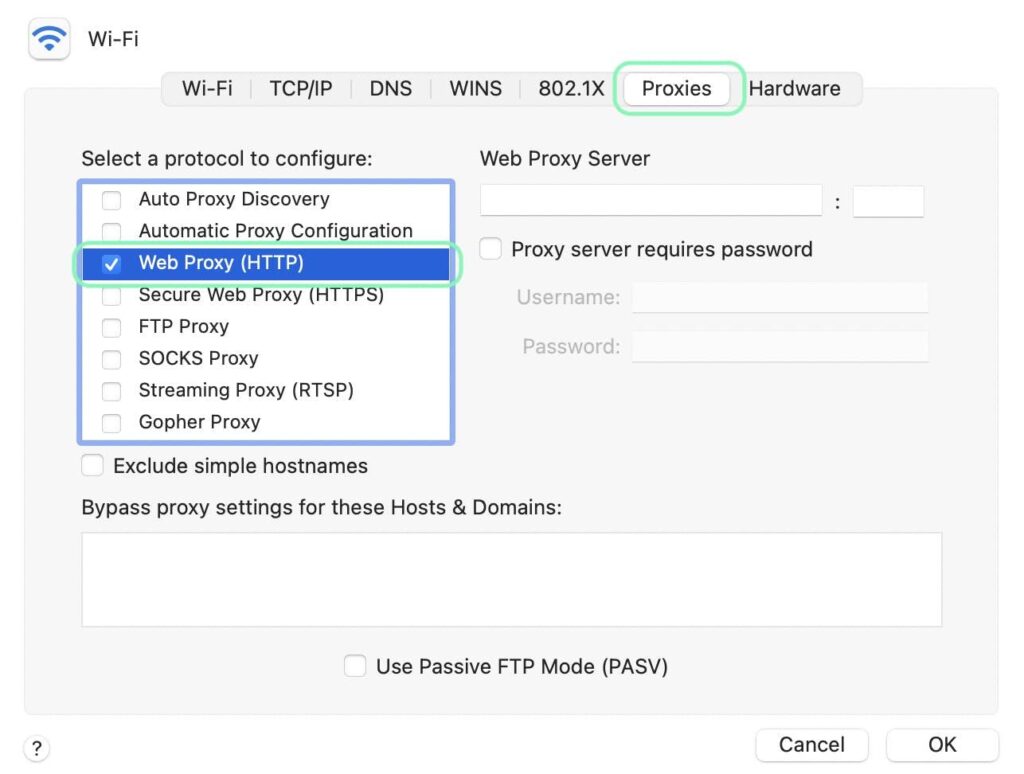
- In the Advanced window, click on the “Proxies” tab.
- You will see a list of proxy protocols, including Web Proxy (HTTP), Secure Web Proxy (HTTPS), SOCKS Proxy, and FTP Proxy.
- Check the box next to the proxy protocol you want to use.
- Enter the proxy server address and port number in the corresponding fields. Your proxy provider should provide this information.
- If your proxy server requires authentication, check the “Proxy server requires password” box and enter your username and password.
- Click “OK” to save your changes.
- Click “Apply” in the Network window to apply the new macOS proxy settings.
Example Configuration
Let’s say you want to configure an HTTP proxy with the following details:
- Proxy Server Address: 192.168.1.100
- Port Number: 8080
- Username: myusername
- Password: mypassword
Here’s how you would configure it:
- Follow the steps above to access the Proxies tab in the Network preferences.
- Check the box next to “Web Proxy (HTTP).”
- Enter “192.168.1.100” in the “Server” field.
- Enter “8080” in the “Port” field.
- Check the “Proxy server requires password” box.
- Enter “myusername” in the “Username” field.
- Enter “mypassword” in the “Password” field.
- Click “OK” and then “Apply.”
Troubleshooting Common Issues
Sometimes, you may encounter issues when configuring macOS proxy settings. Here are some common problems and how to troubleshoot them:
- Cannot Connect to the Internet:
- Make sure the proxy server address and port number are correct.
- Check your username and password if the proxy server requires authentication.
- Verify that the proxy server is online and accessible.
- Slow Internet Speed:
- The proxy server may be overloaded or located far away from your location. Try using a different proxy server.
- Check your internet connection speed.
- Website Not Loading:
- The website may be blocked by the proxy server. Try using a different proxy server or contacting the proxy provider.
- Clear your browser cache and cookies.
Advanced macOS Proxy Settings
In addition to the basic proxy settings, macOS also offers some advanced options that you may find useful.
Automatic Proxy Configuration (PAC)
A PAC (Proxy Auto-Configuration) file is a script that tells your browser or operating system which proxy server to use for a given URL. This can be useful if you need to use different proxy servers for different websites or applications.
To configure a PAC file:
- In the Proxies tab of the Network preferences, check the box next to “Automatic Proxy Configuration.”
- Enter the URL of the PAC file in the “URL” field.
- Click “OK” and then “Apply.”
Web Proxy Auto-Discovery (WPAD)
WPAD (Web Proxy Auto-Discovery) is a protocol that allows your computer to automatically discover the appropriate proxy server on your network. This can simplify the configuration process, especially in large organizations.
To use WPAD, make sure that the “Auto Proxy Discovery” box is checked in the Proxies tab of the Network preferences. Your network administrator will need to configure the WPAD server on your network.
Excluding Domains and IP Addresses
Sometimes, you may want to bypass the proxy server for certain domains or IP addresses. For example, you might want to access internal network resources directly without going through the proxy.
To exclude domains and IP addresses:
- In the Proxies tab of the Network preferences, enter the domains or IP addresses you want to exclude in the “Bypass proxy settings for these Hosts & Domains” field. Separate multiple entries with commas.
- Click “OK” and then “Apply.”
Using Proxies with Different Applications
While configuring macOS proxy settings at the system level will affect most applications, some applications may have their own proxy settings that you need to configure separately. Here are some examples:
- Web Browsers: Most web browsers, such as Safari, Chrome, and Firefox, will use the system-wide proxy settings by default. However, you can also configure proxy settings directly in the browser’s settings menu.
- Email Clients: Some email clients, such as Mail, may require you to configure proxy settings separately. Check the email client’s settings menu for proxy options.
- Other Applications: Some applications may not support proxy servers at all. In this case, you may need to use a third-party application to tunnel the traffic through the proxy.
Security Considerations
While using a proxy server can enhance your privacy and security, it’s important to choose a reputable proxy provider and take some basic security precautions:
- Choose a Reputable Proxy Provider: Research the proxy provider and make sure they have a good reputation for security and privacy. Avoid free proxy services, as they may be unreliable or even malicious.
- Use HTTPS Proxies: When possible, use HTTPS proxies to encrypt your traffic and protect it from eavesdropping.
- Enable Encryption: Make sure that your browser and other applications are configured to use encryption (HTTPS) whenever possible.
- Keep Your Software Up to Date: Install the latest security updates for your operating system and applications to protect against vulnerabilities.
- Be Careful What You Click: Avoid clicking on suspicious links or downloading files from untrusted sources, as they may contain malware.
Conclusion
Configuring macOS proxy settings can be a powerful tool for enhancing your privacy, bypassing restrictions, and improving network performance. By following the steps outlined in this guide, you can easily configure proxy settings on your Mac and start taking advantage of the benefits they offer. Remember to choose a reputable proxy provider and take basic security precautions to protect your data and privacy. Understanding how to manage your macOS proxy settings gives you greater control over your internet experience, whether you’re a casual user or a seasoned professional. Don’t hesitate to explore the advanced options and tailor your settings to meet your specific needs. With the right configuration, you can optimize your online experience and stay secure in today’s digital landscape. This guide provides a solid foundation for understanding and implementing macOS proxy settings effectively, empowering you to navigate the internet with confidence and control.
