Start Python on Windows: A Comprehensive Guide for Beginners
Python has become a cornerstone in various fields, from web development to data science. If you’re looking to start Python on Windows, this guide provides a comprehensive walkthrough to get you up and running. We’ll cover everything from downloading and installing Python to setting up your development environment and running your first script.
Why Choose Python?
Before diving into the installation process, let’s briefly explore why Python is such a popular choice. Python’s clear syntax and extensive libraries make it an excellent language for beginners. It’s also highly versatile, suitable for a wide range of applications, including:
- Web development (using frameworks like Django and Flask)
- Data science and machine learning (with libraries like NumPy, Pandas, and Scikit-learn)
- Scripting and automation
- Scientific computing
- Game development
Prerequisites
Before you start Python on Windows, ensure you have the following:
- A computer running Windows (7, 8, 10, or 11)
- An internet connection to download the necessary files
- Administrator privileges to install software
Step-by-Step Installation Guide
Download Python
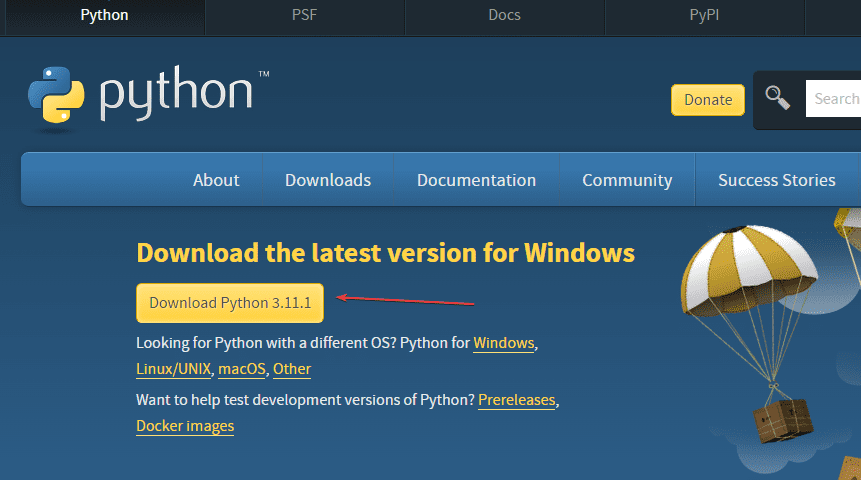
The first step is to download the latest version of Python from the official website. Here’s how:
- Open your web browser and go to https://www.python.org/downloads/windows/.
- Choose the latest stable release of Python. Generally, it’s recommended to download the executable installer.
- Select the appropriate installer for your system (32-bit or 64-bit). If you’re unsure, you can usually choose the 64-bit version.
Install Python
Once the download is complete, run the installer. Follow these steps:
- Check the box that says “Add Python X.X to PATH” (where X.X is the version number). This is crucial for easily running Python from the command line.
- Click “Install Now” to begin the installation process. You can also choose “Customize installation” if you want to change the installation directory or install specific components.
- If prompted, allow the installer to make changes to your device.
- Wait for the installation to complete.
Verify the Installation
After the installation, verify that Python is installed correctly. Here’s how:
- Open the Command Prompt (search for “cmd” in the Start menu).
- Type
python --versionand press Enter. - If Python is installed correctly, you should see the Python version number displayed.
You can also check if the Python interpreter works:
- Type
pythonand press Enter. - This will open the Python interactive shell. You should see something like
Python 3.9.7 (tags/v3.9.7:1dc3e56, Sep 16 2021, 16:37:15) [MSC v.1929 64 bit (AMD64)] on win32. - Type
print("Hello, World!")and press Enter. - You should see “Hello, World!” printed on the screen.
- Type
exit()and press Enter to exit the Python interactive shell.
Setting Up Your Development Environment
While you can write Python code in any text editor, using an Integrated Development Environment (IDE) can significantly improve your coding experience. Here are some popular IDEs for Python:
- Visual Studio Code (VS Code): A free and highly customizable editor with excellent Python support.
- PyCharm: A dedicated Python IDE with advanced features like code completion, debugging, and testing.
- Spyder: A popular IDE for scientific computing and data science.
- Thonny: A beginner-friendly IDE designed for learning Python.
For this guide, we’ll use Visual Studio Code. Here’s how to set it up:
- Download and install Visual Studio Code from https://code.visualstudio.com/.
- Open VS Code.
- Click on the Extensions icon in the Activity Bar (or press Ctrl+Shift+X).
- Search for “Python” and install the official Microsoft Python extension.
- Restart VS Code.
The Python extension provides features like syntax highlighting, code completion, linting, and debugging, making it easier to write and debug Python code.
Running Your First Python Script
Now that you have Python installed and your development environment set up, let’s run your first Python script:
- Open Visual Studio Code.
- Create a new file (File > New File) and save it as
hello.py. - Type the following code into the file:
print("Hello, World!")
- Save the file (File > Save).
- Open the integrated terminal in VS Code (View > Terminal).
- Type
python hello.pyand press Enter. - You should see “Hello, World!” printed in the terminal.
Congratulations! You’ve successfully run your first Python script on Windows.
Common Issues and Troubleshooting
Sometimes, you might encounter issues when you start Python on Windows. Here are some common problems and their solutions:
- ‘python’ is not recognized as an internal or external command: This usually means that Python is not added to the PATH environment variable. Make sure you checked the “Add Python to PATH” option during installation. If not, you can manually add Python to the PATH.
- ModuleNotFoundError: No module named ‘…’ : This means that the required Python module is not installed. You can install it using pip (Python’s package installer). For example, to install the NumPy library, you would run
pip install numpyin the Command Prompt or terminal. - Permission errors: Sometimes, you might encounter permission errors when installing packages or running scripts. Try running the Command Prompt or terminal as an administrator.
Using Pip to Install Packages
Pip is a package installer for Python. It allows you to easily install and manage third-party libraries and packages. To use pip, open the Command Prompt or terminal and type pip install <package_name>. For example, to install the requests library, you would type pip install requests.
It’s often a good practice to use virtual environments to isolate your project dependencies. A virtual environment creates a self-contained directory that contains a specific Python version and its associated packages. This prevents conflicts between different projects and ensures that each project has its own set of dependencies.
To create a virtual environment, you can use the venv module. Open the Command Prompt or terminal and navigate to your project directory. Then, type python -m venv <environment_name>. For example, to create a virtual environment named “myenv”, you would type python -m venv myenv.
To activate the virtual environment, you need to run a script in the environment’s directory. On Windows, you can activate the environment by typing myenvScriptsactivate in the Command Prompt or terminal.
Once the virtual environment is activated, you can install packages using pip. The packages will be installed in the virtual environment’s directory, and they will only be available when the environment is activated.
Further Learning Resources
Now that you know how to start Python on Windows, here are some resources to help you continue learning:
- Official Python Tutorial: https://docs.python.org/3/tutorial/
- Codecademy: https://www.codecademy.com/learn/learn-python-3
- Coursera: https://www.coursera.org/courses?query=python
- edX: https://www.edx.org/learn/python
These resources offer a variety of courses and tutorials to help you learn Python at your own pace. Remember to practice regularly and experiment with different projects to solidify your understanding.
Conclusion
Starting Python on Windows is a straightforward process. By following the steps outlined in this guide, you can easily install Python, set up your development environment, and run your first script. With Python’s versatility and extensive libraries, you’ll be well-equipped to tackle a wide range of programming tasks. Happy coding! Don’t forget to explore the various online resources available to deepen your understanding and expand your skills. Continue practicing, and you’ll be amazed at what you can achieve with Python.
[See also: Python Best Practices for Beginners]
[See also: Choosing the Right Python IDE]
